Before they get boring
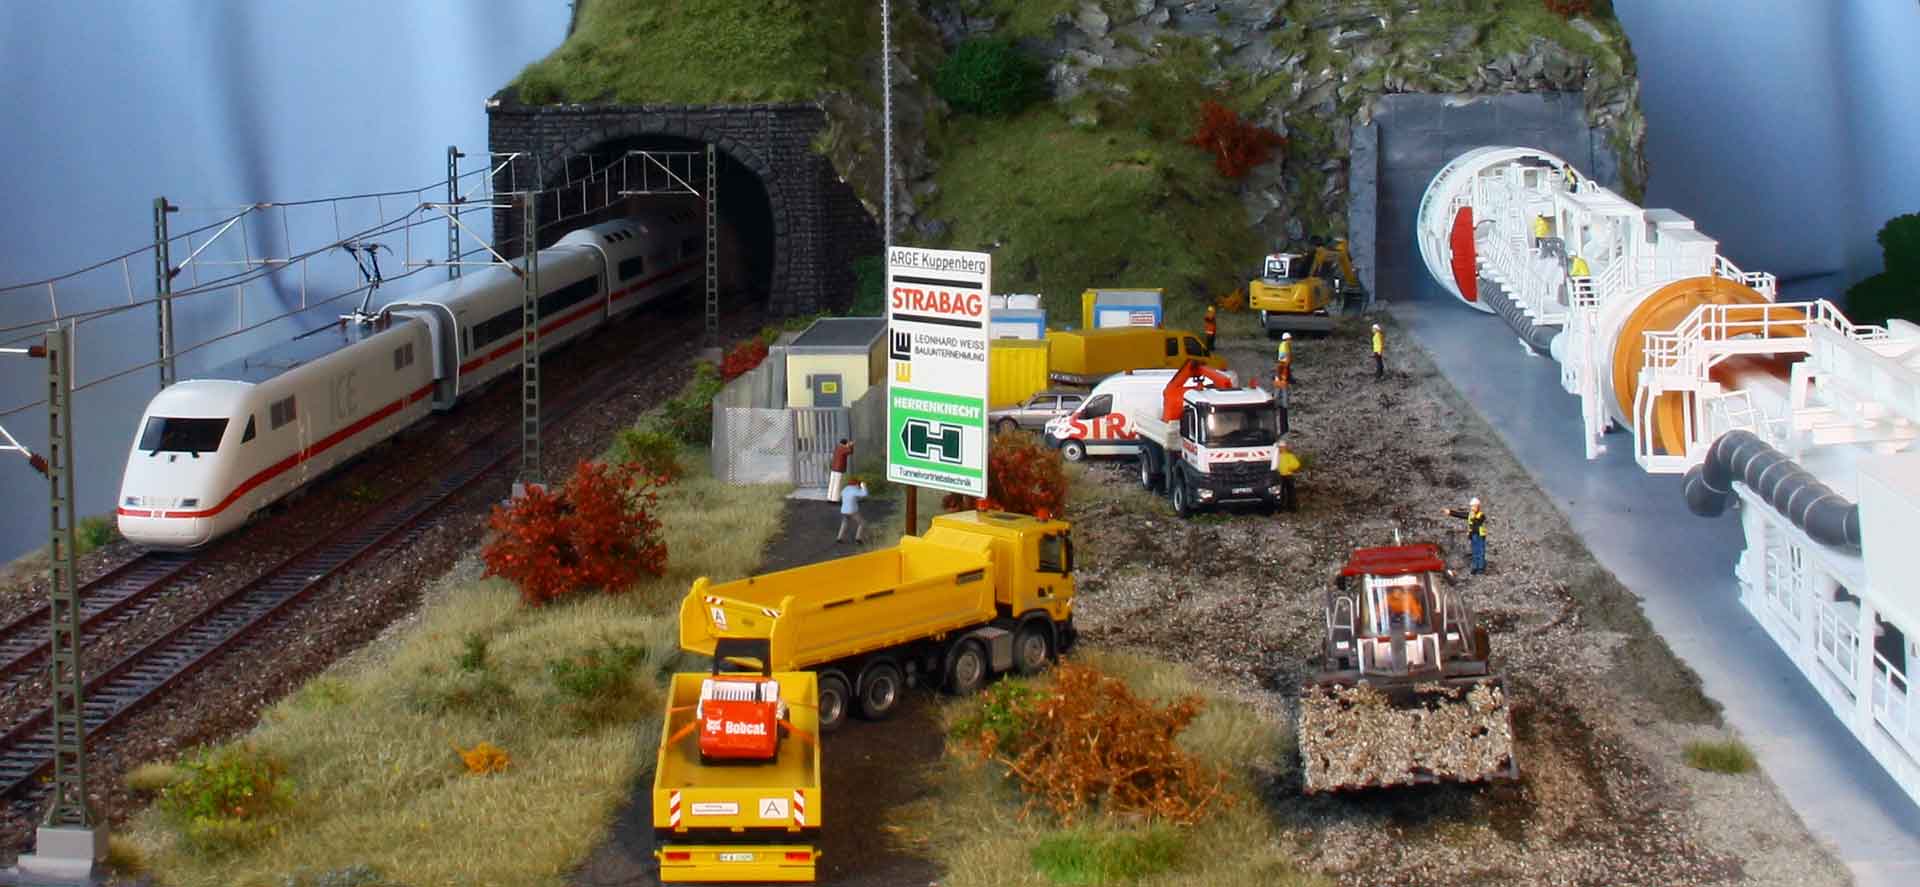
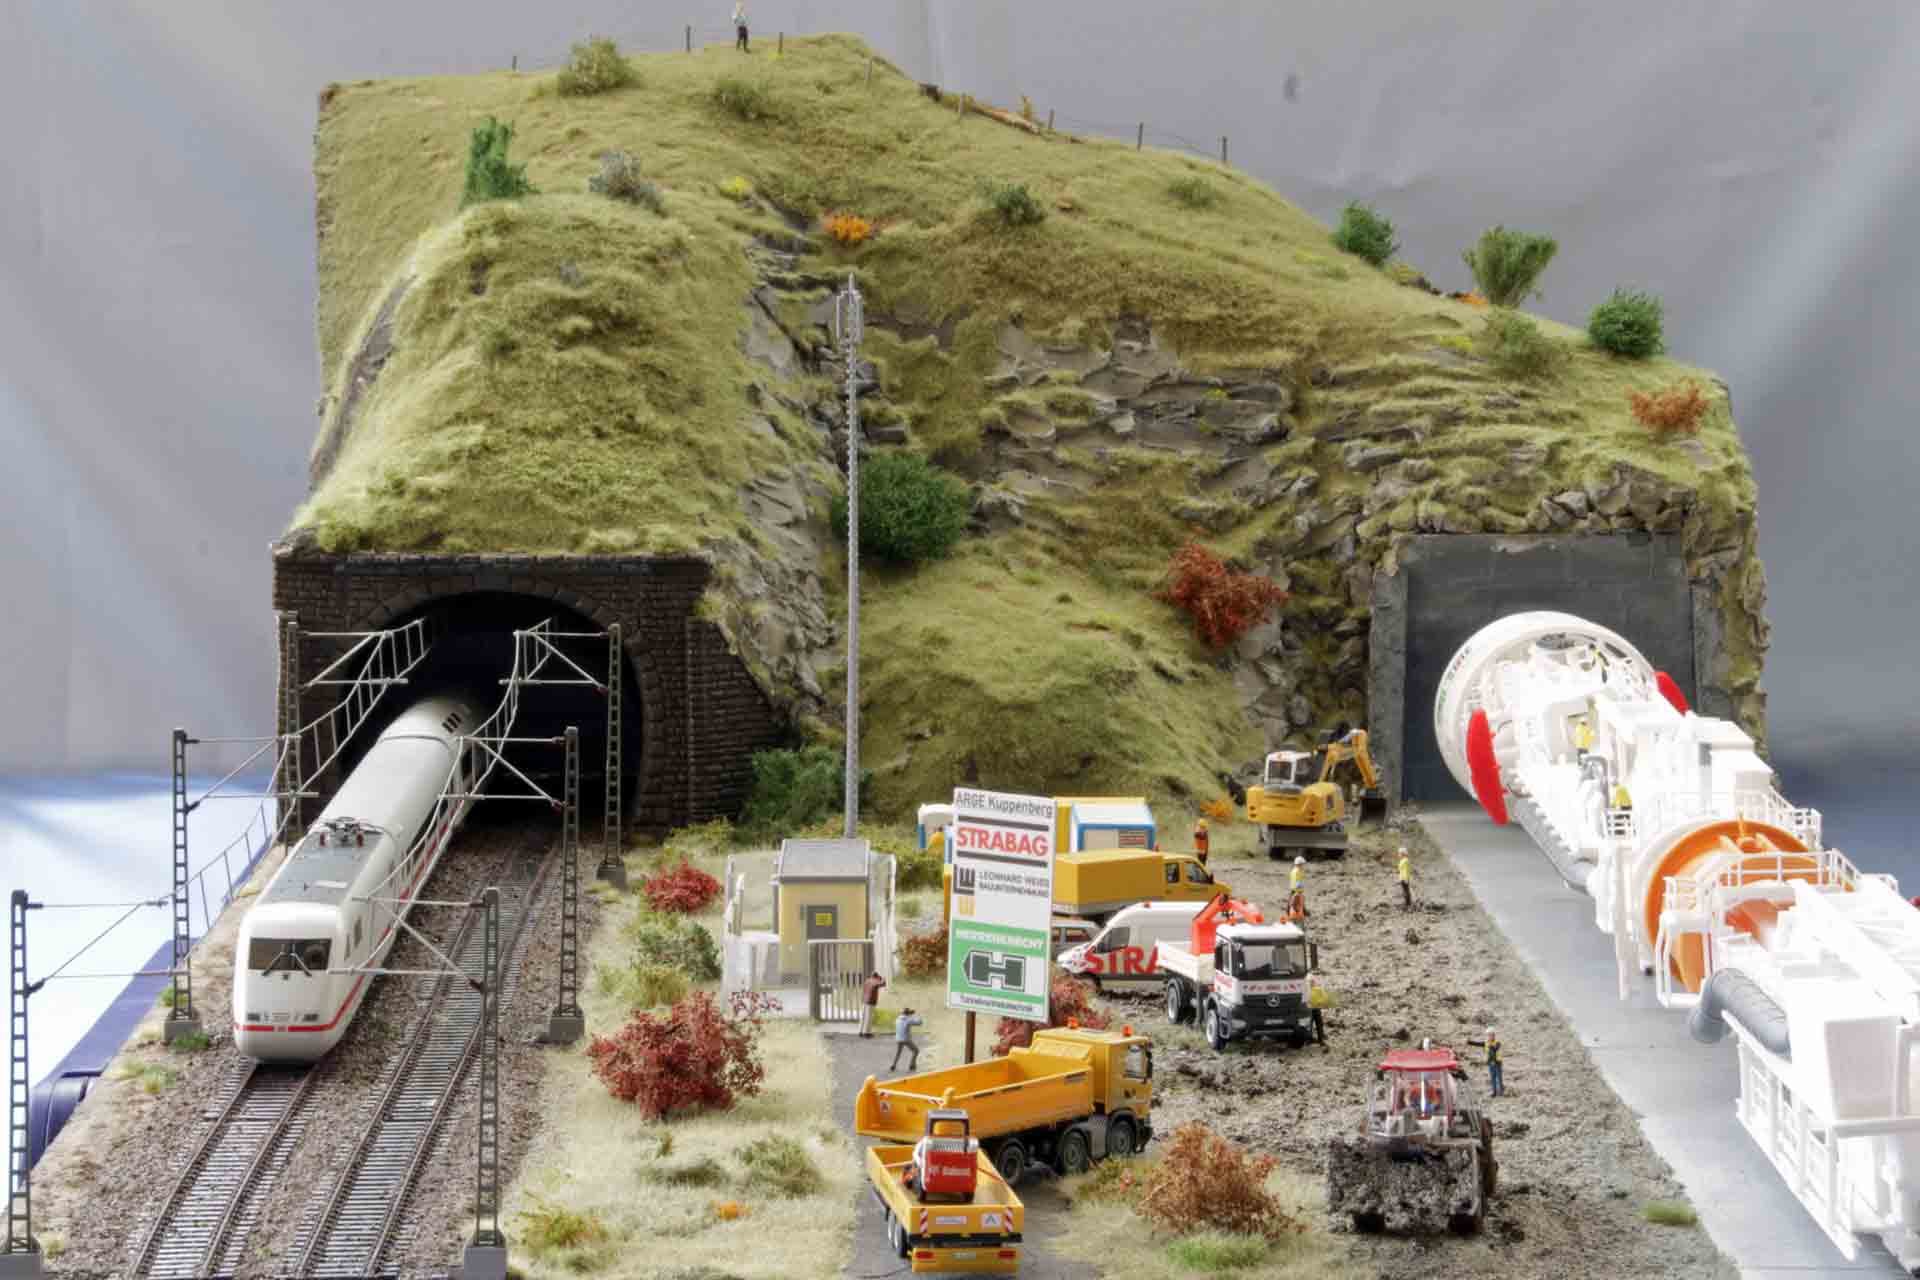
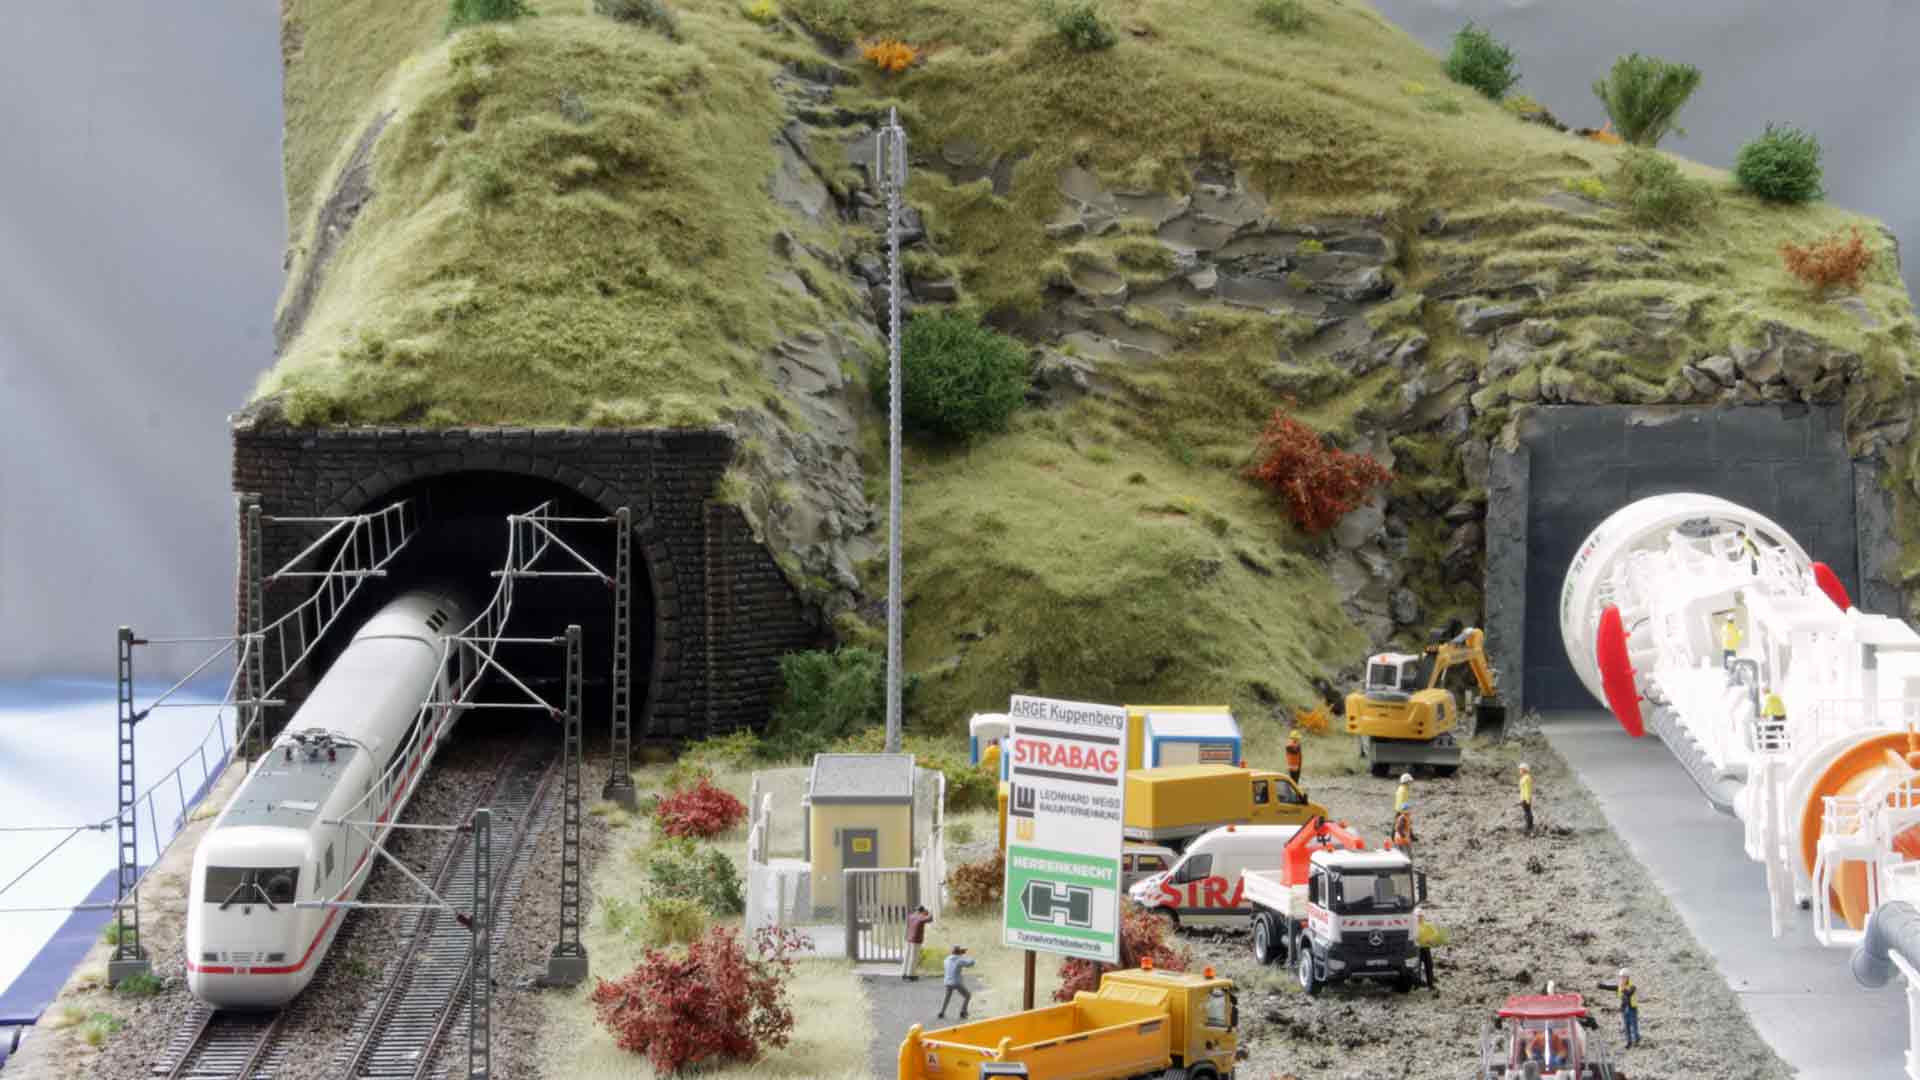
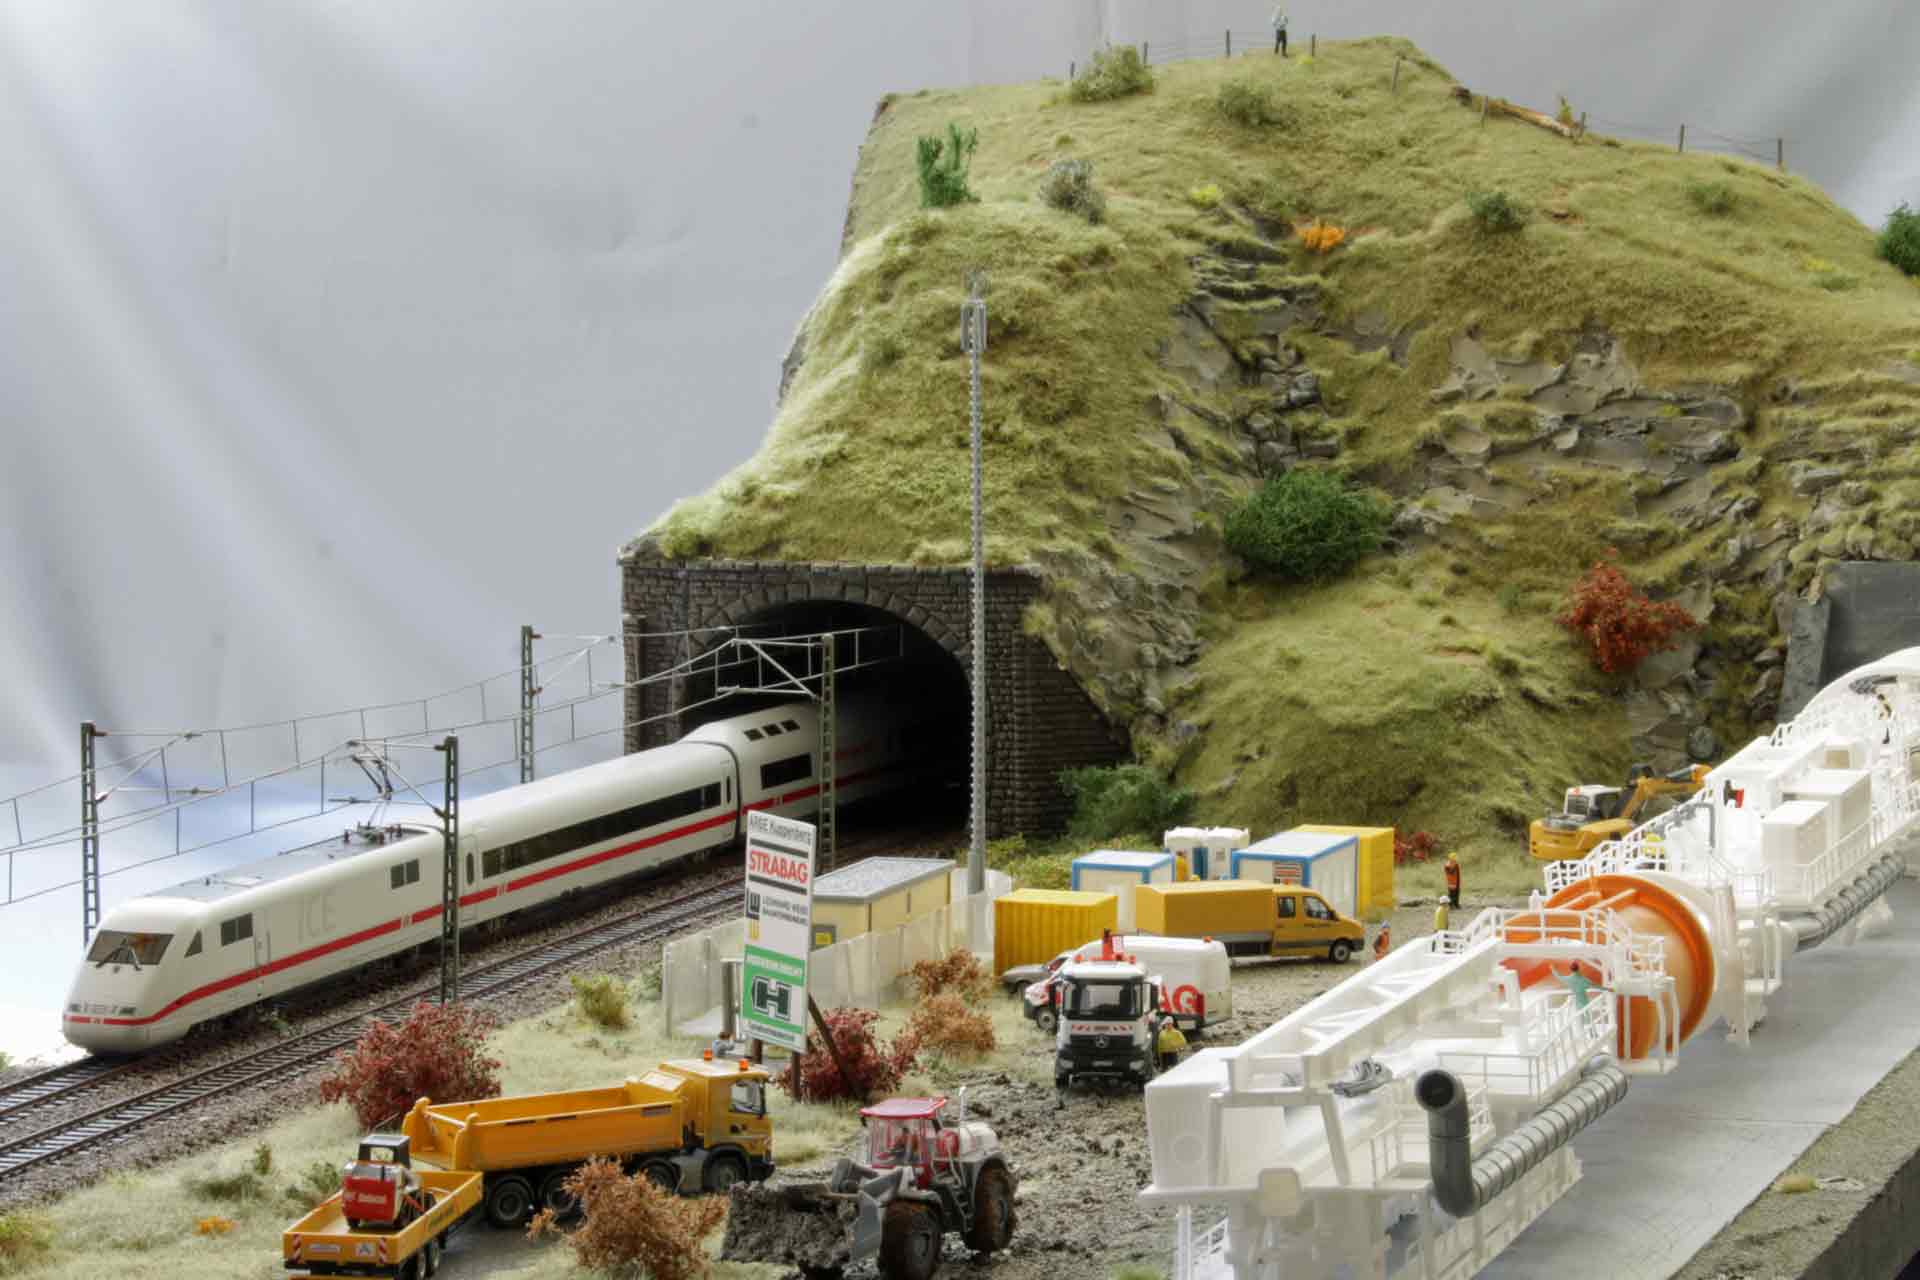
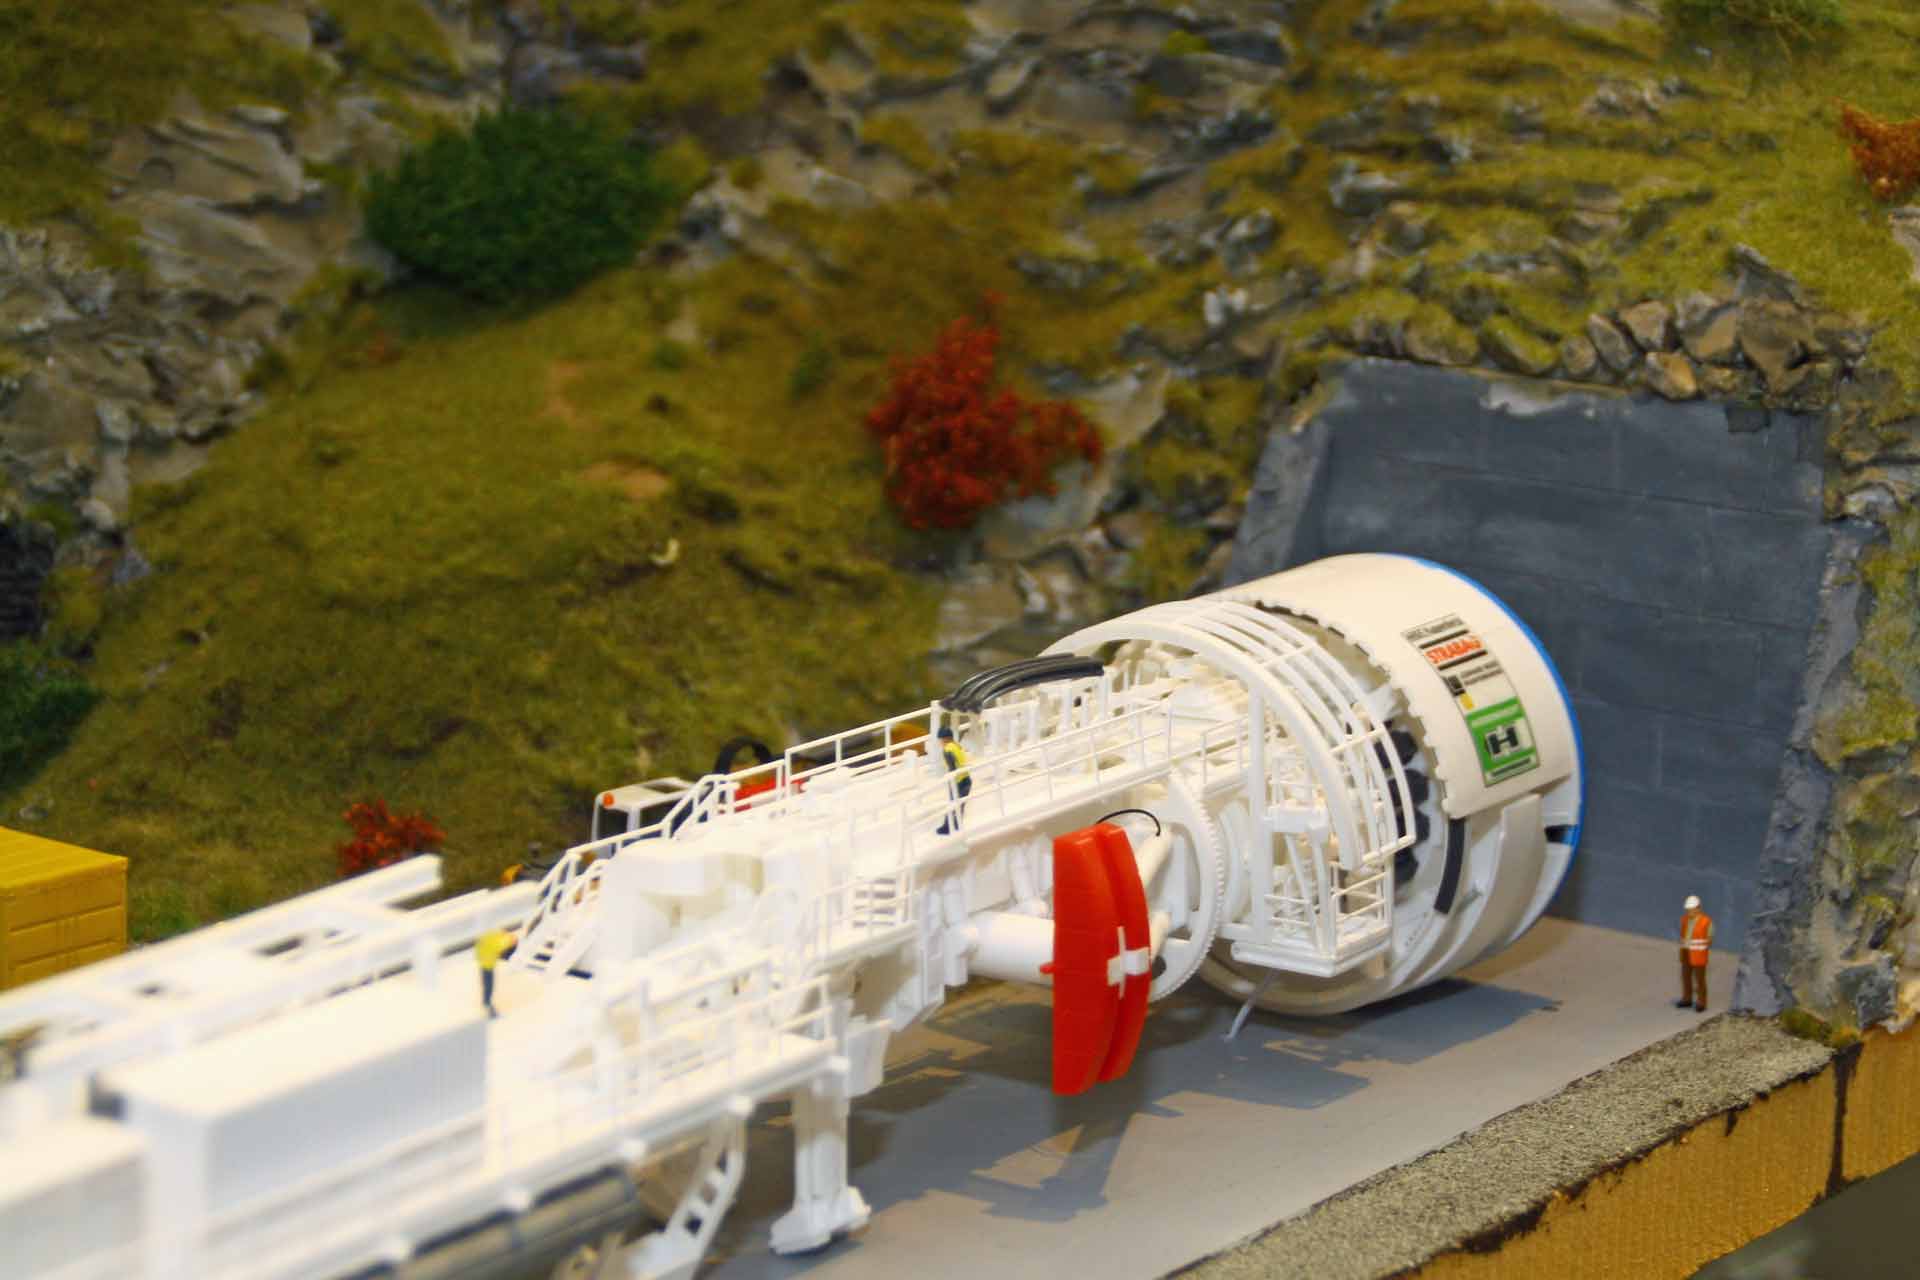
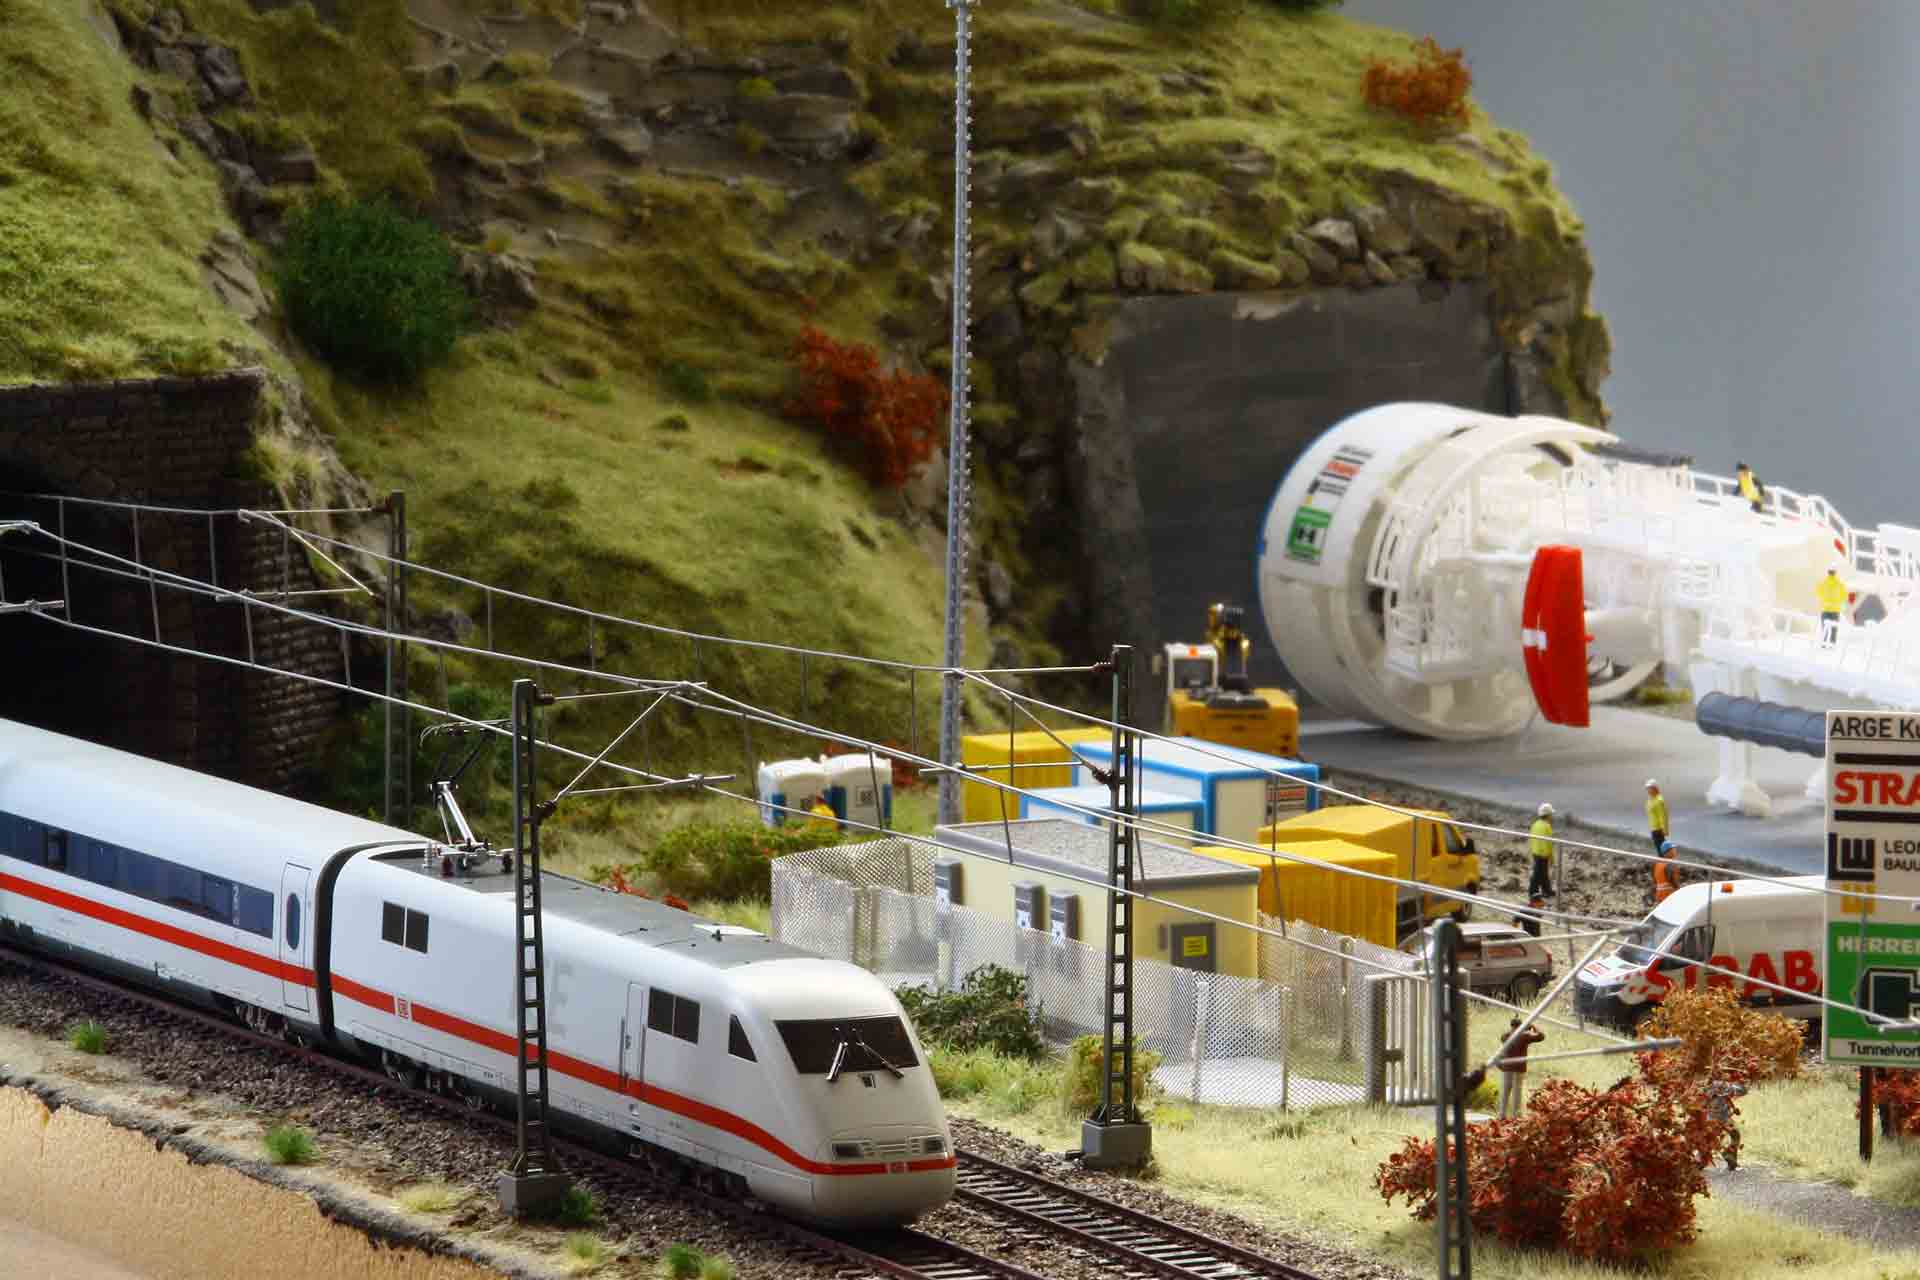
Fascinated by the new Faller "Gripper" tunnel boring machine, Heinz Hofmann decided this TBM deserved to be showcased on a fitting diorama. No sooner said than done: A construction site is depicted shortly before boring works begin on the fictitious "Kuppenberg" tunnel, which is to be built parallel to an old mainline railroad line. In addition, modern railroad technology in the form of an electronic signal box is being installed adjacent to the construction site.
The diorama is built on a standard Styrodur board from the DIY store, so the size of 125 × 60 cm and a thickness of 40 mm is predetermined. A double-track, electrified main line and an electronic signal box are laid down on this. Sufficient space is left for the construction site with the concrete slab required for setting up the TBM; but do remember, the model measures 97 cm in length. Due to the complexity of assembling the machine, this model is not necessarily recommended for beginners. A mountain forms the end of one narrow side. The existing railroad line also ends in a tunnel. This is to be retained as an alternative route alongside the new line. In order to keep down the showpiece’s weight, all modeling work is carried out exclusively with the ultralight model filler from RTS. After hardening, this can be easily worked on with standard modeling tools.
Preparatory works
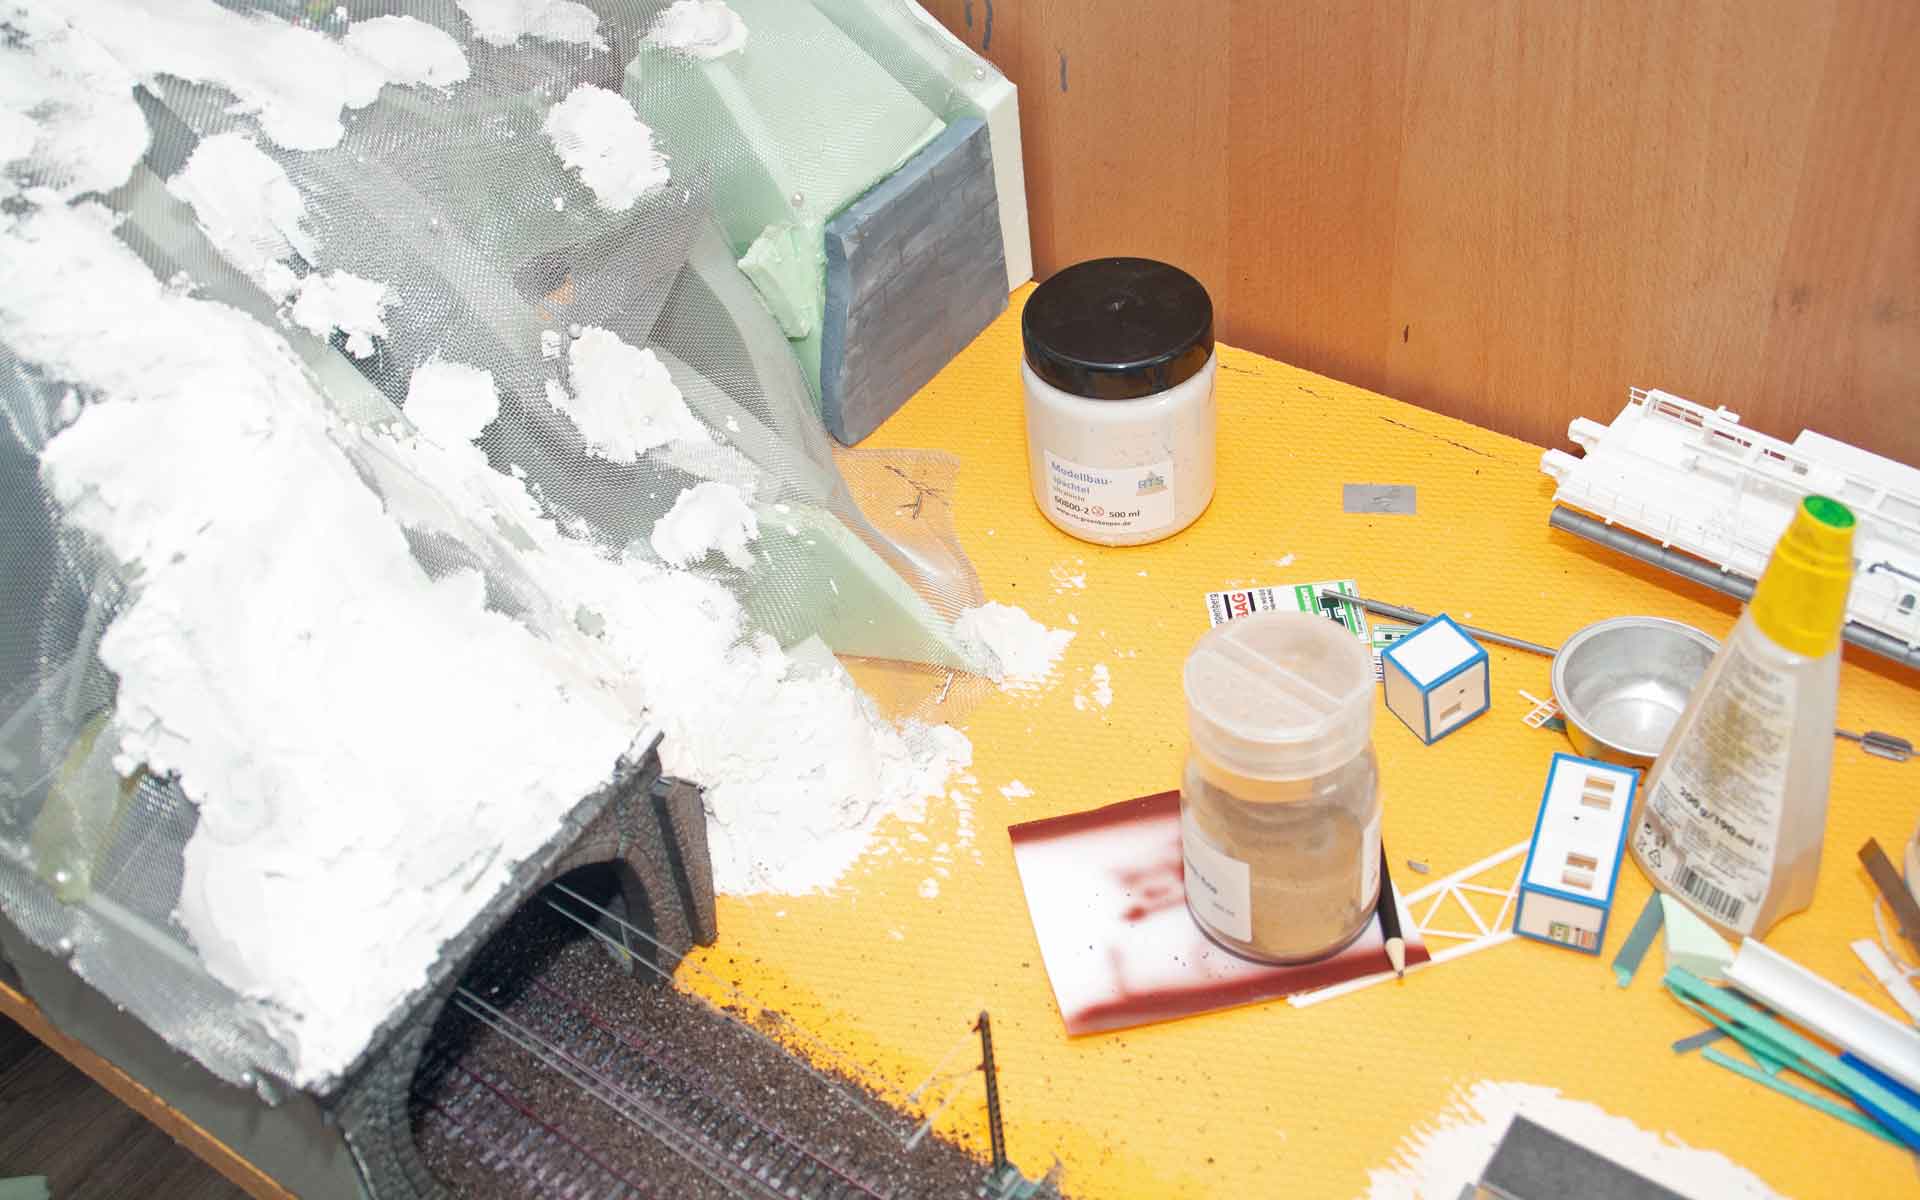
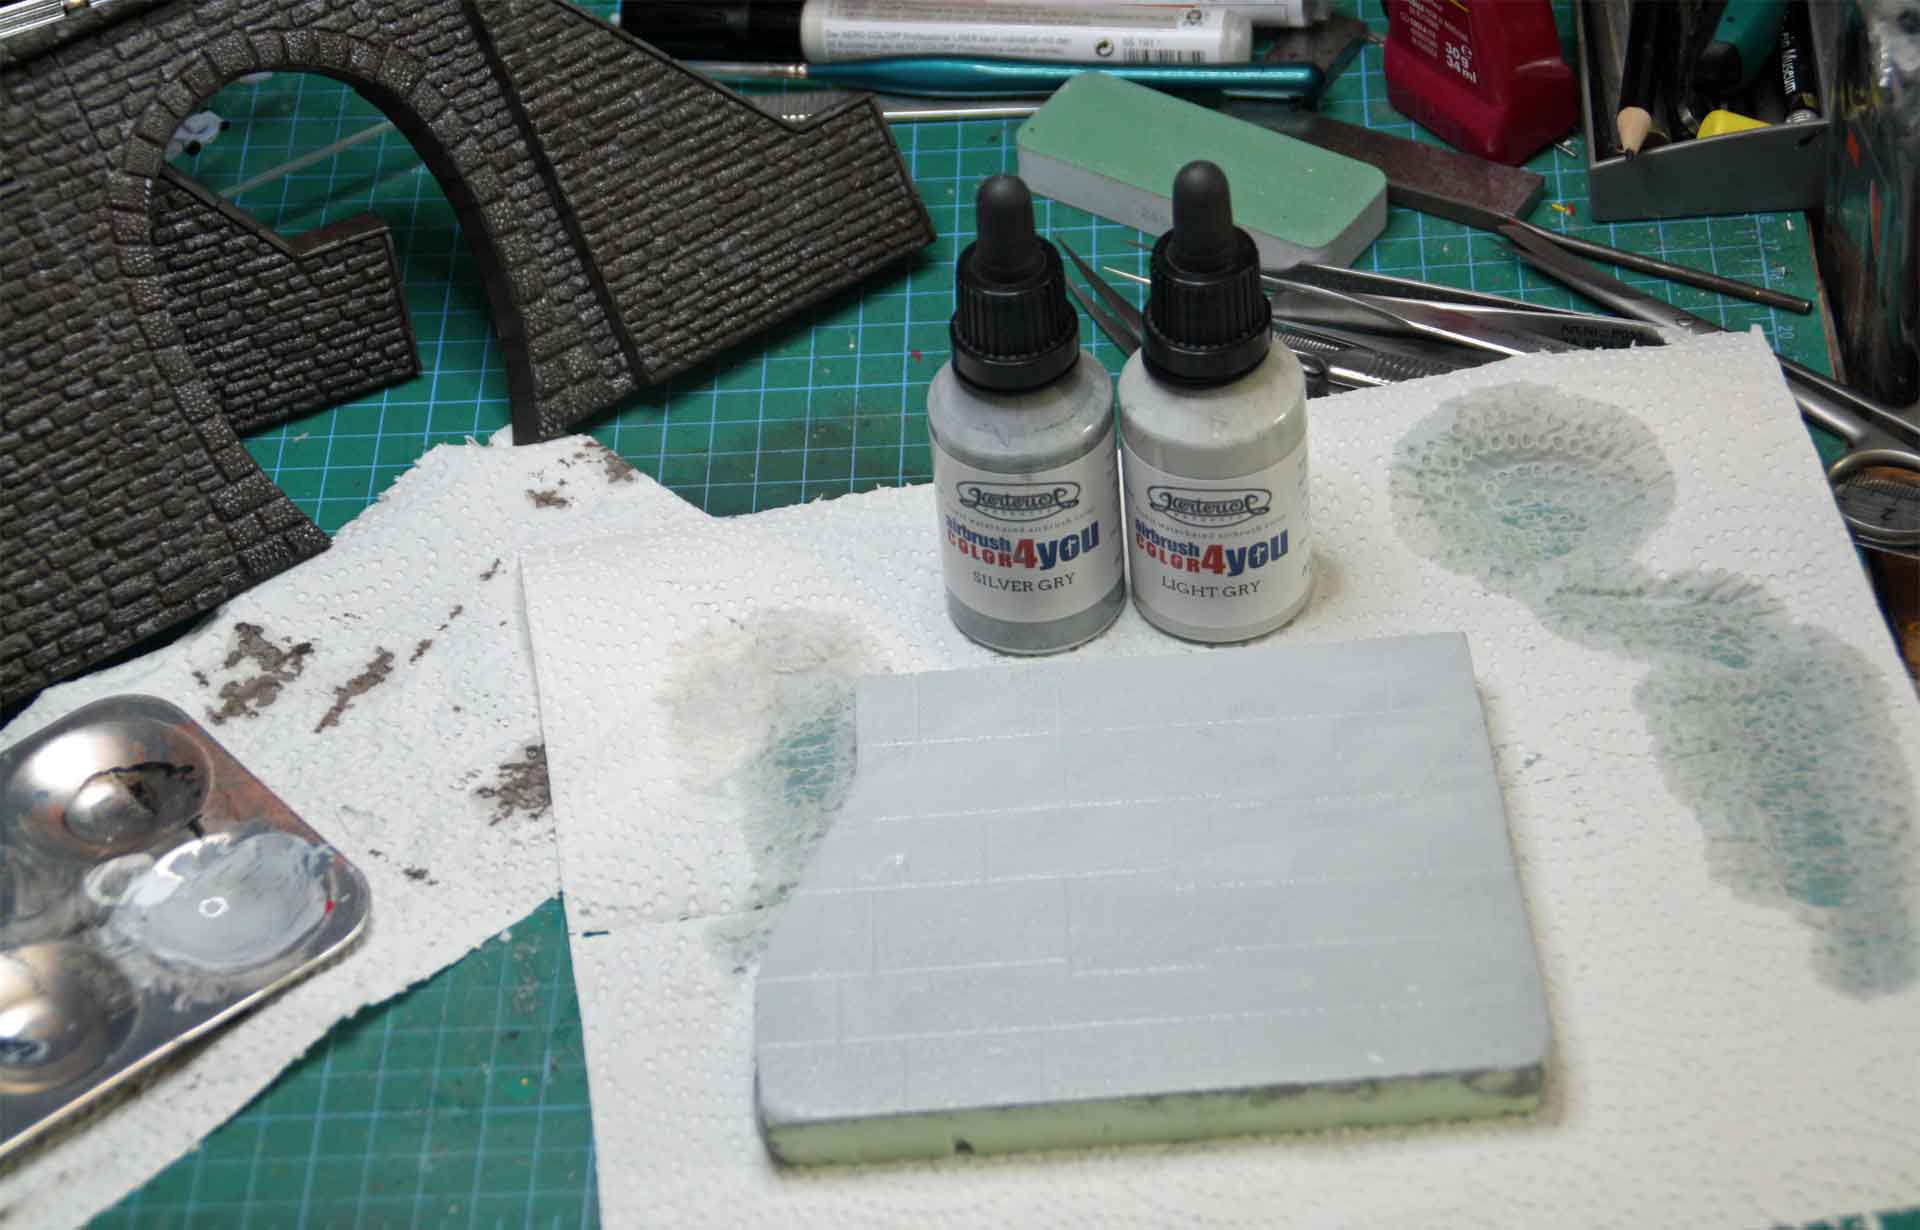
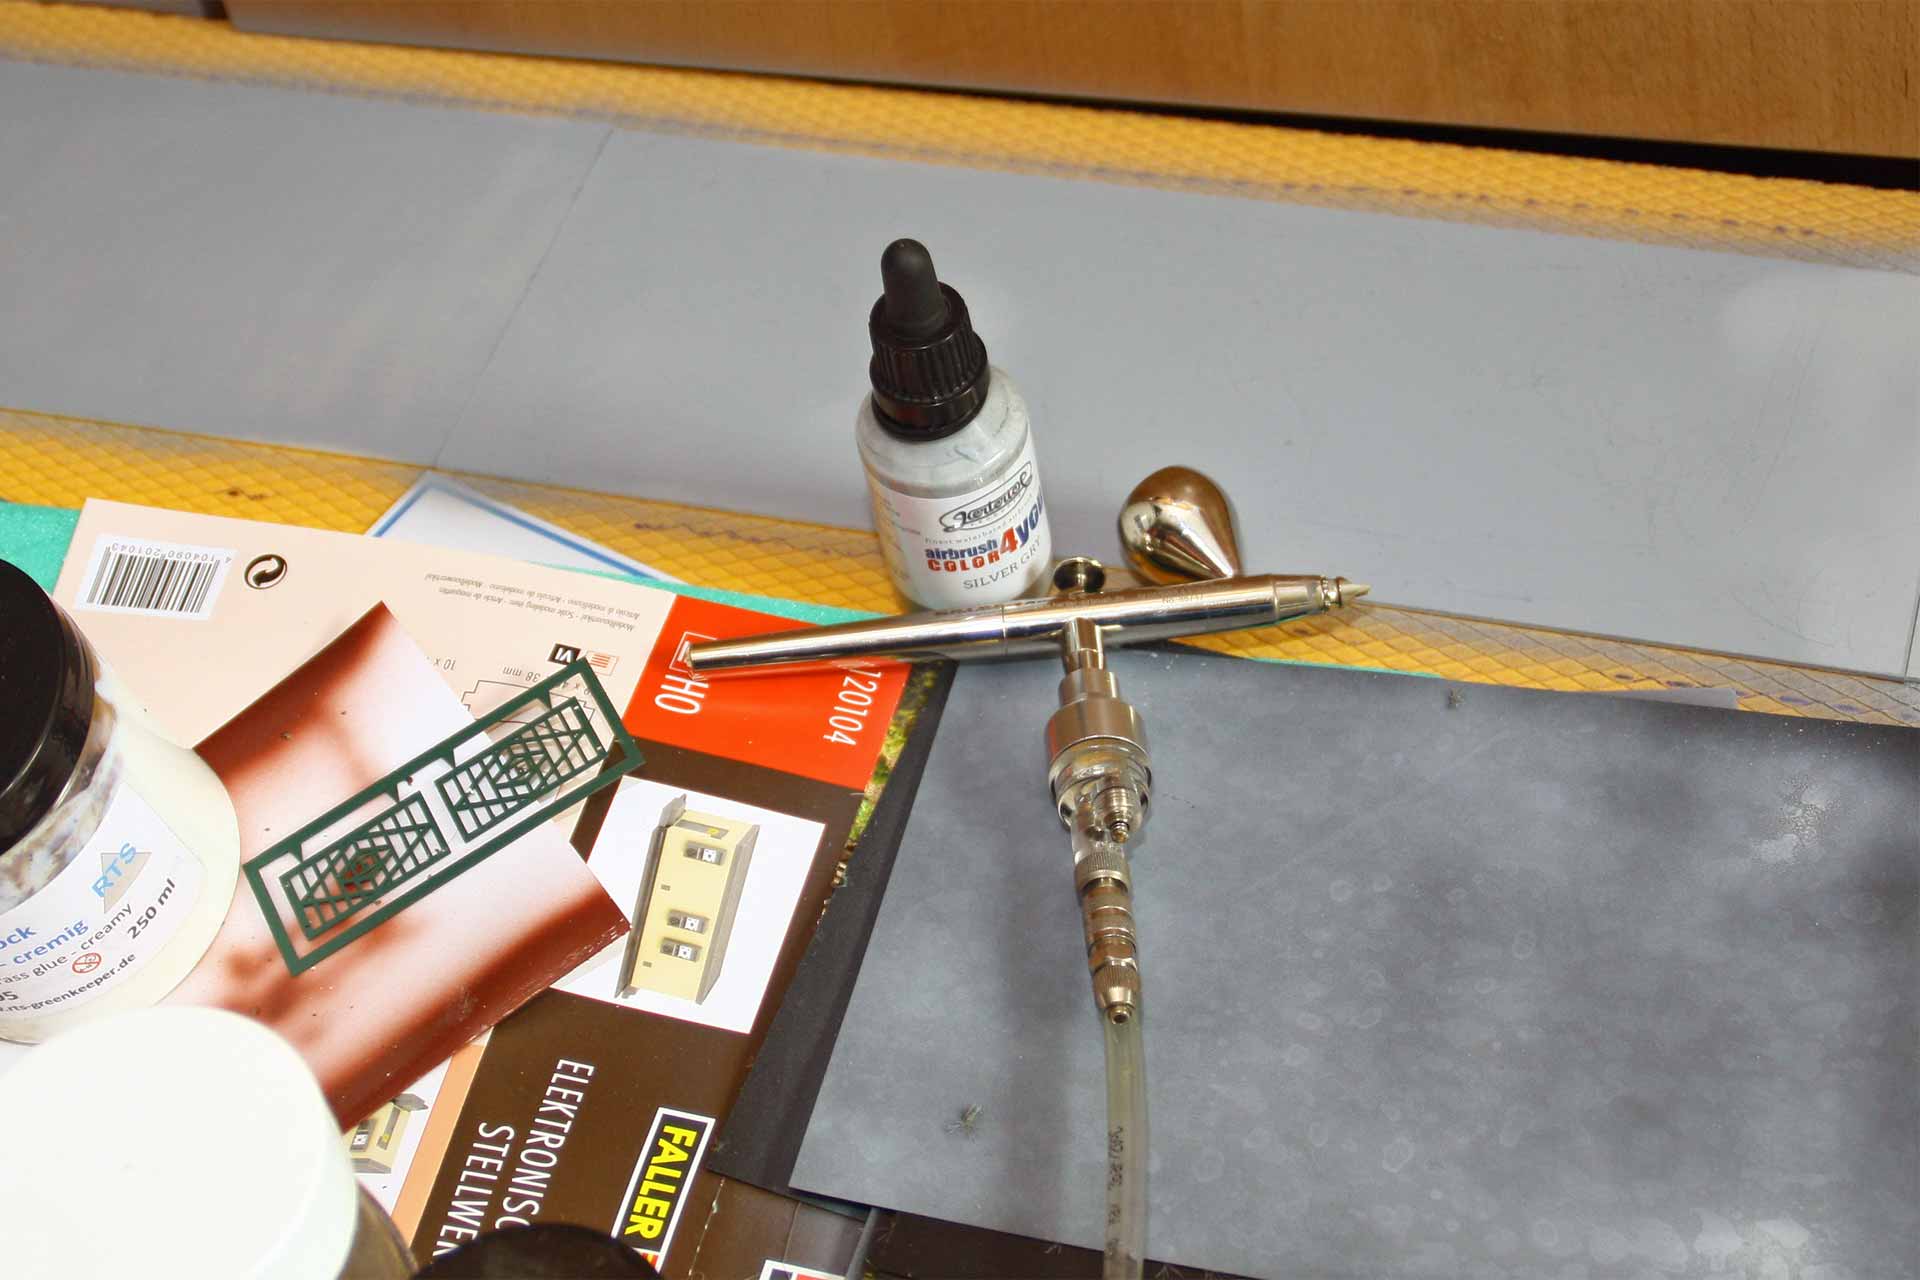
First, the office containers and the Faller electronic signal box are assembled according to the building instructions enclosed. The concrete wall through which the tunnel is to be bored is made from a 10 mm thick piece of Styrodur and is slightly larger than the diameter of the boring head. It is given a color treatment in various shades of grey with acrylic paints from the AirbrushColor4you paint series. During this preparatory phase, the double-track tunnel portal for the "old railroad line" is also assembled and primed with the aforementioned acrylic paints and aged with a wash.
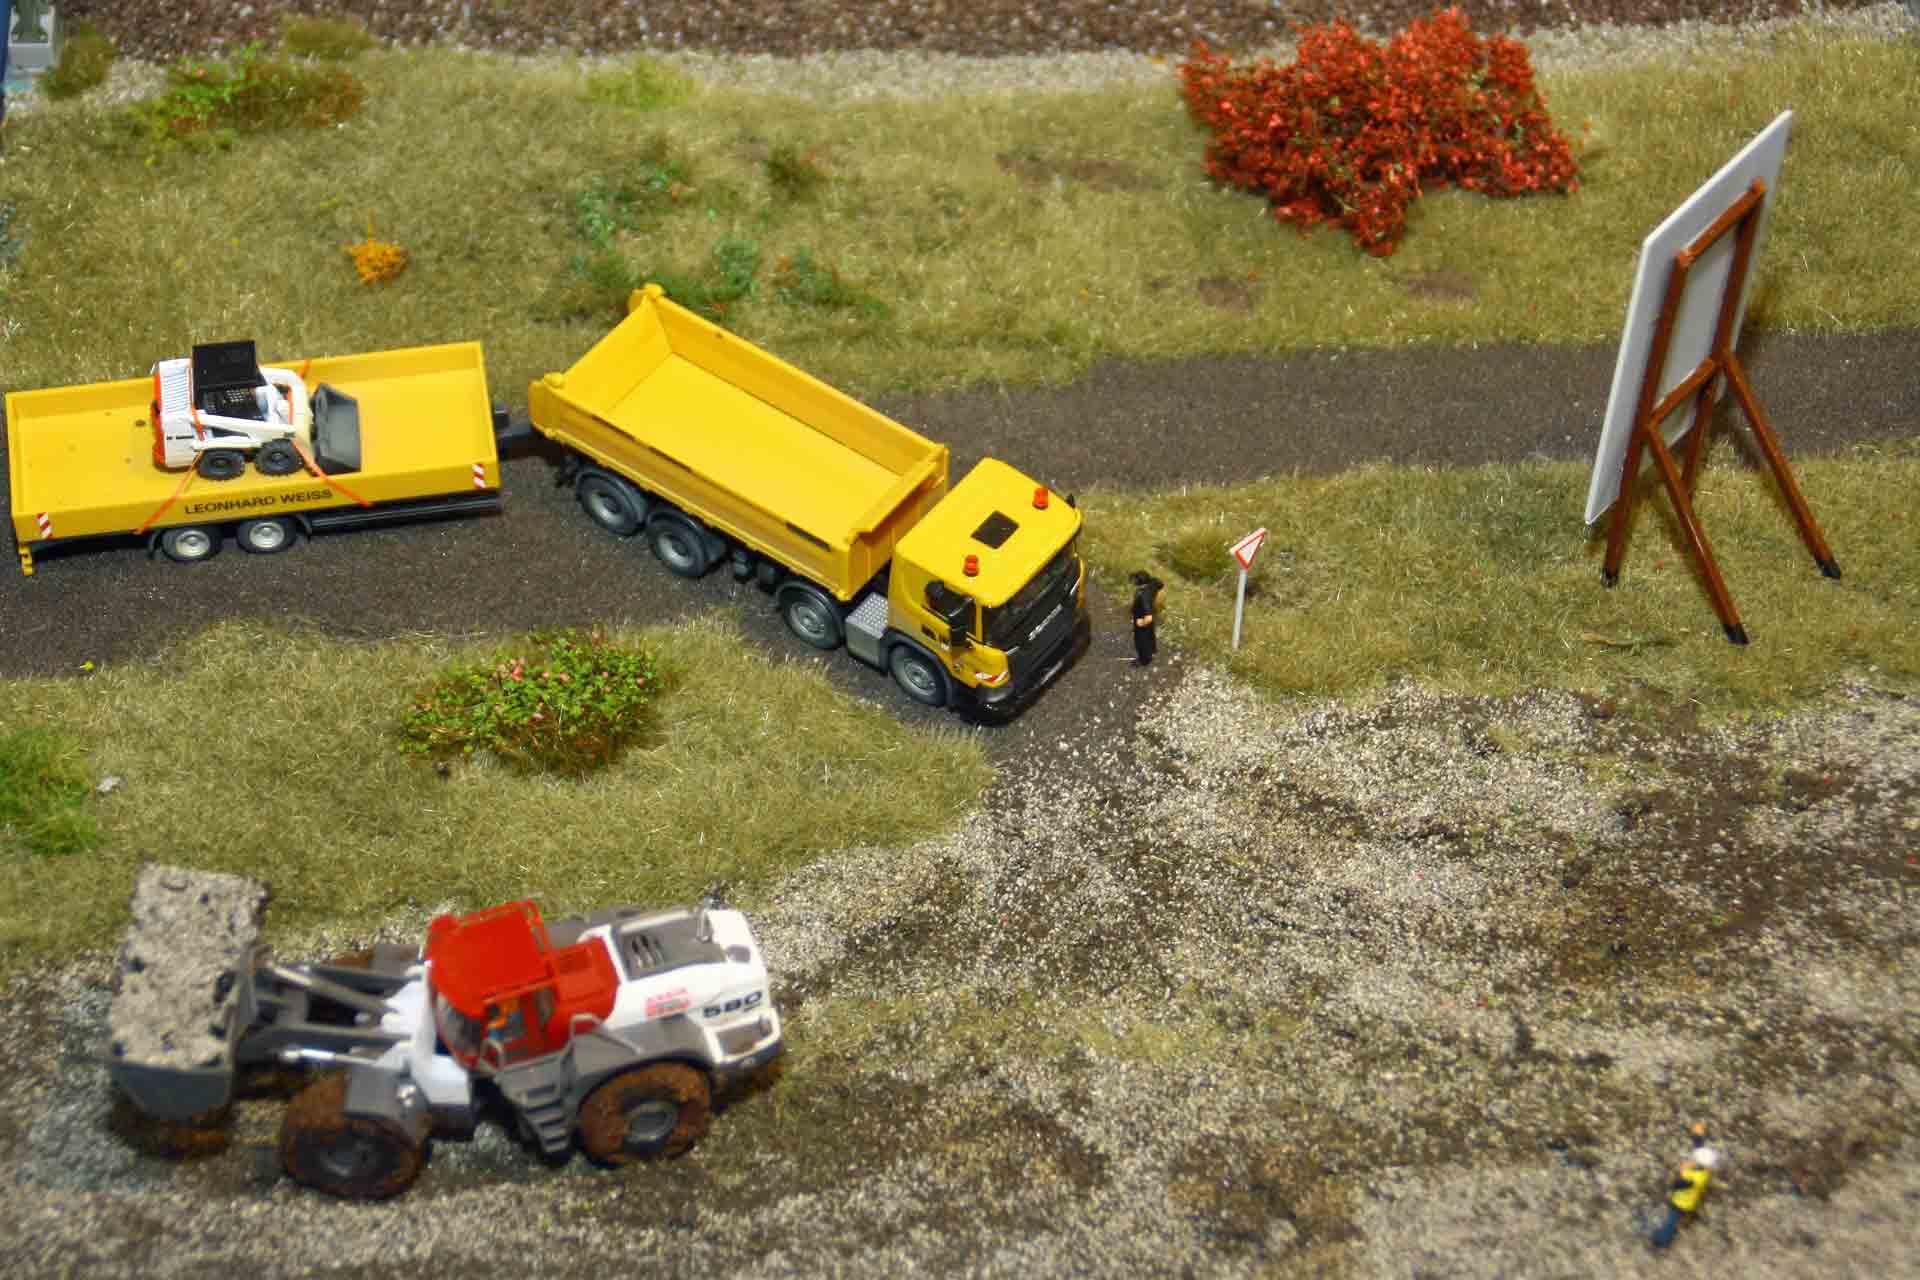
The numerous construction site vehicles are fitted with the supplied wing mirrors and then given license plates. A light ageing is then applied with the airbrush and acrylic paints. Care must be taken to ensure that only light soiling occurs. You can only just see that the wheel loader has been used in the muddy area for some time. Like all the decals used in the showpiece - including the large construction site sign - the vehicle license plates are made to order by mmh-Modellbau. A small Bobcat is mounted on a trailer. In reality, this would be used during the drilling process to clear the tunnel floor of rocks falling behind the drill head. In the final step, a base plate for the future track body is cut to size from 3 mm Styrodur.
The first construction works
Now glue the base for the future track body to the base plate of the showpiece using solvent-free all-purpose adhesive. Until the adhesive has dried, the plate must be weighted down sufficiently to prevent it from warping. Then paint it with dark gray acrylic paint from the DIY store. This prevents the color of the Styrodur board from shining through after the tracks have been ballasted. Once the paint has dried, the two tracks are laid, fixed in place with so-called Krause clamps and aligned. Once everything fits together, the tracks are fixed to the base. Low-viscosity superglue is used here. The next step is to paint the tracks, sleepers and track bed. This is done with an airbrush, here using "Infinity" and AirbrushColor4you paints, in various shades of brown and gray. The next step is to fit the base plinths for the future Viessmann overhead line. In order to do so, the base plates of the overhead line masts are fixed at a distance of 360 mm, which corresponds to the length of the contact wire used. As an old line is being depicted, DB lattice masts are used. The two masts in the tunnel, which serve as a stopping point for the contact wires, are now also installed. Once all the mast supports have been attached to the track, the track is ballasted. But go easy on the blue metal - this prevents individual stones poking up.
A mountainside is created
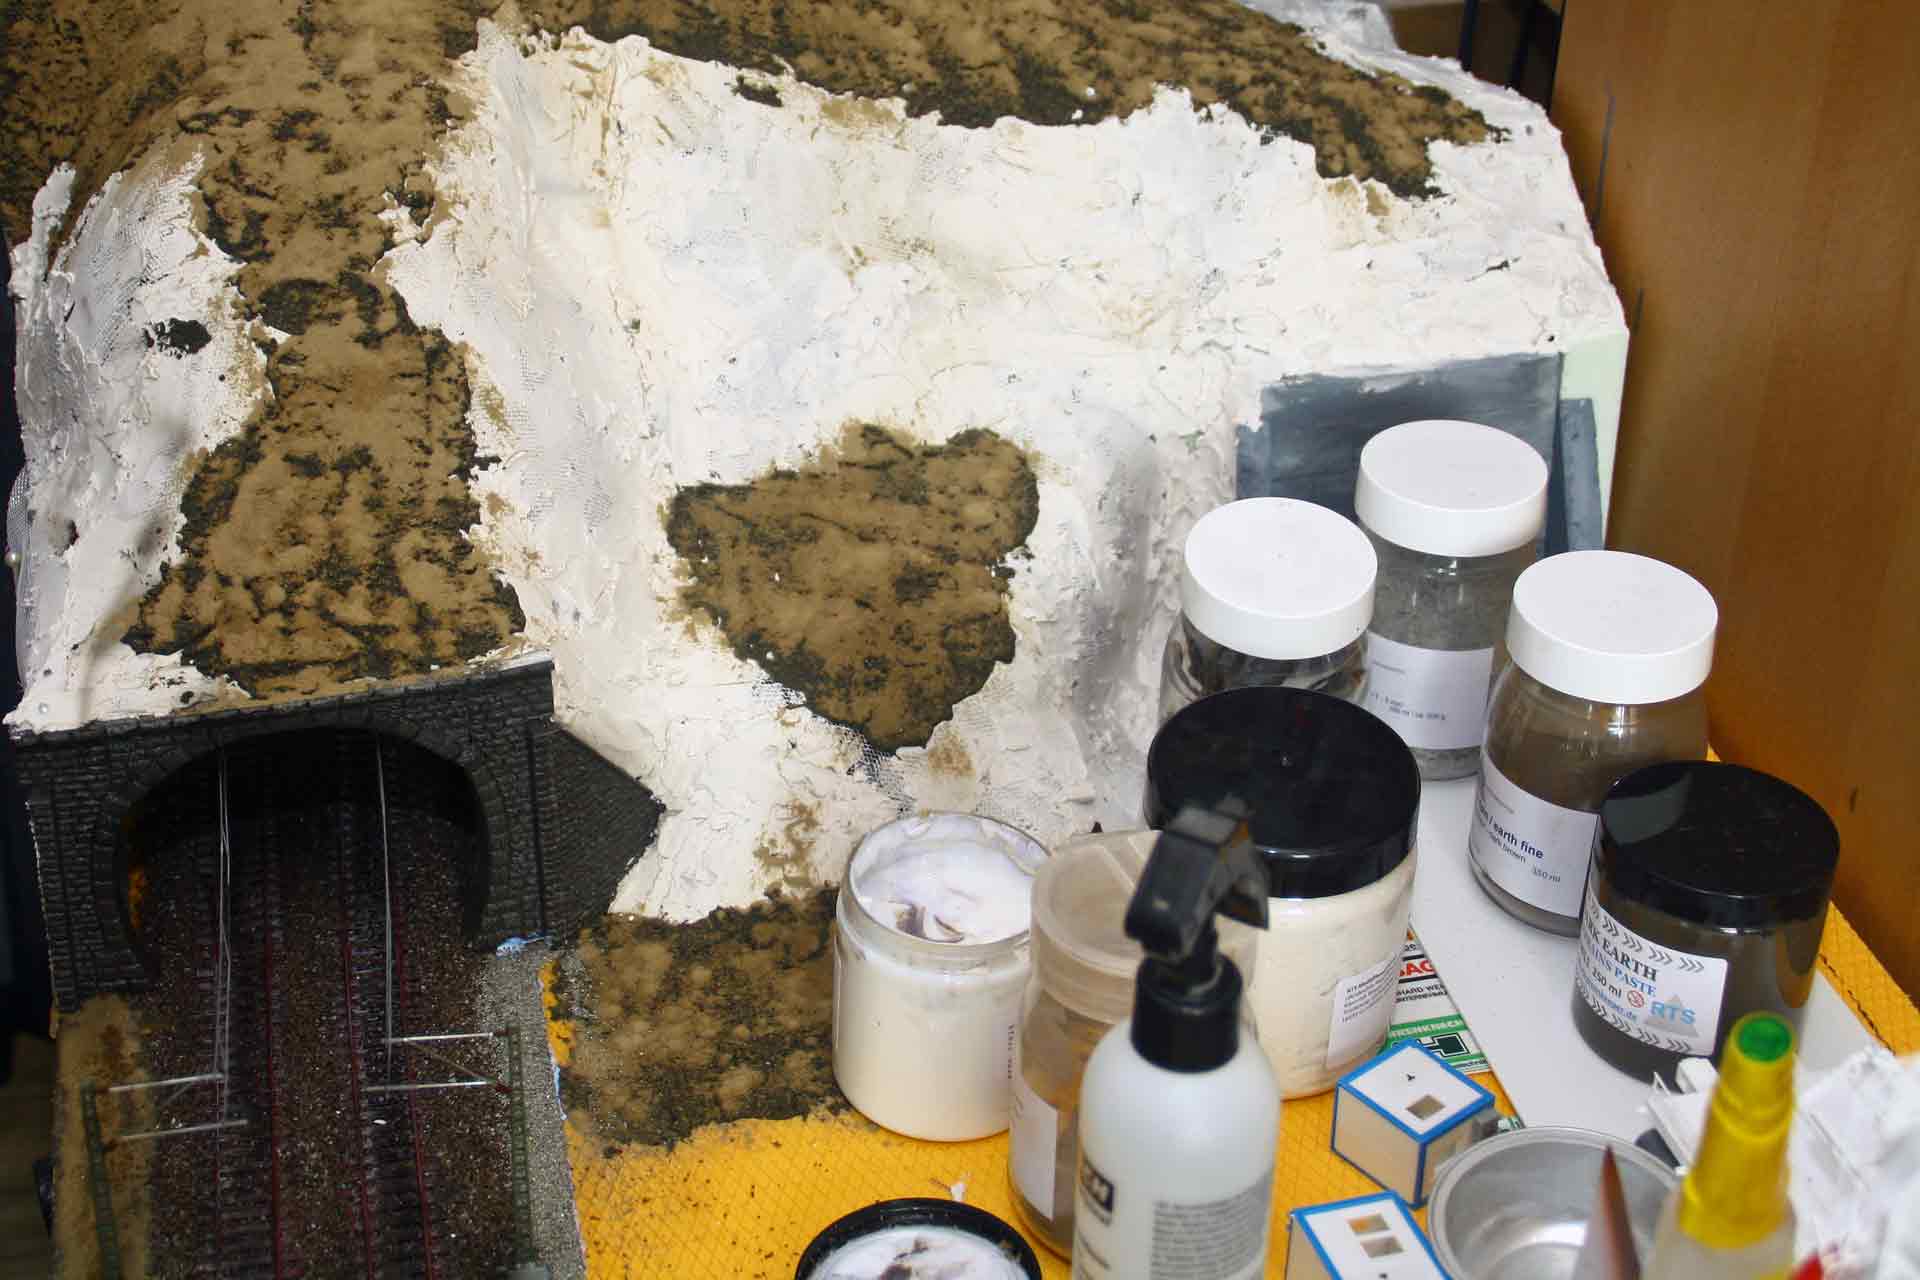
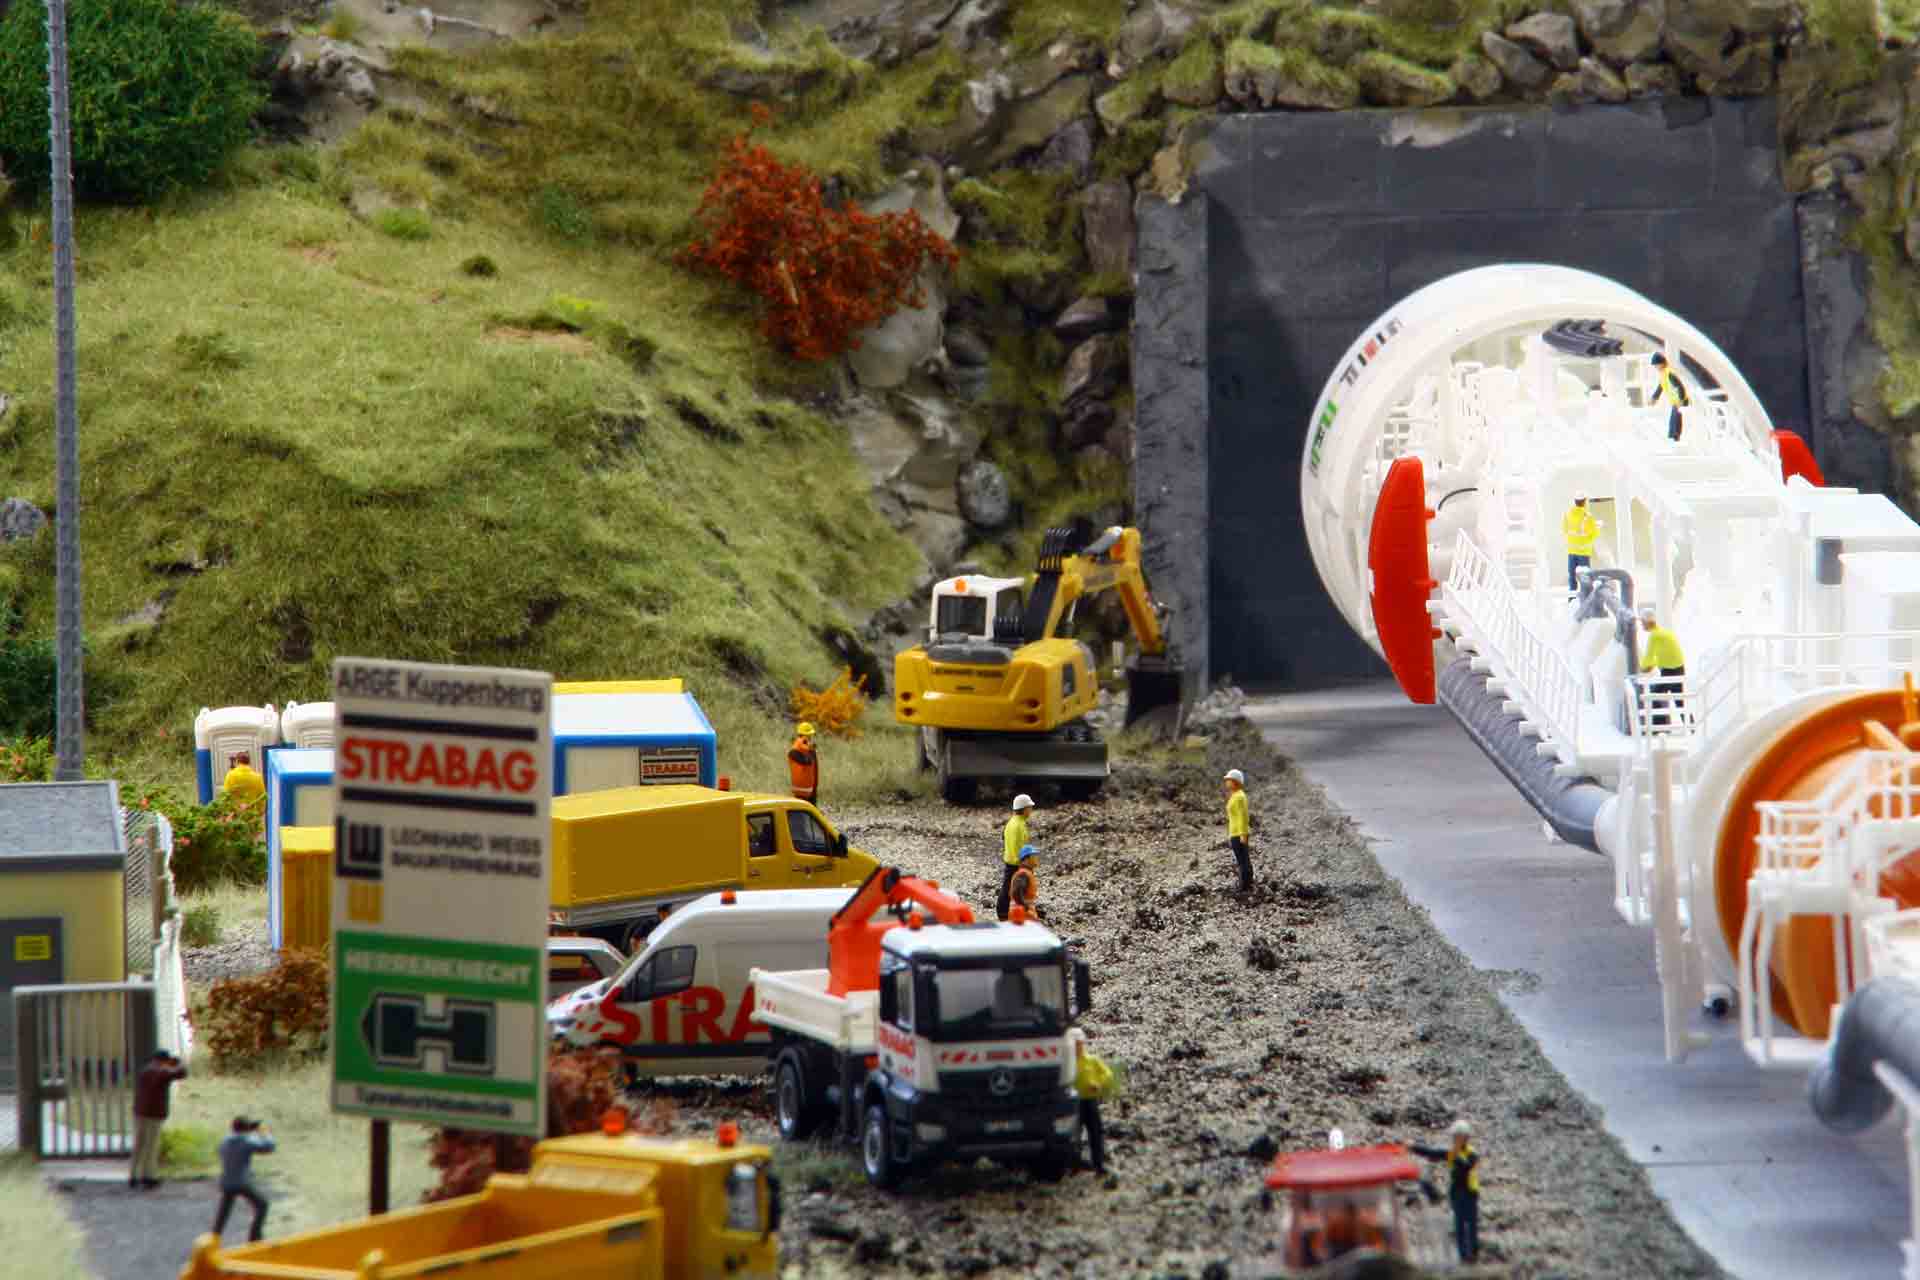
The basic form of the mountainside is roughly constructed using sections of Styrodur cut to size and glued to the base plate with hot glue. An aluminum mesh grid from the DIY store, shaped to form realistic contours, is put on top and fixed in place with long deco pins or similar. RTS Ultralight model filler is then applied with a fine spatula. If you work carefully, it is not necessary to pre-treat the surface with any padding such as crepe paper. After hardening, the filler provides a stable and easy-to-work surface. The already prepared concrete wall through which the mountainside will be pierced is also put in place during this construction phase. Areas that are not to have a rock-like texture later on are detailed more finely with "Dark Earth" terrain paste from RTS, and in some areas prepped with "Earth fine dark brown" for the later planting of trees and shrubs.
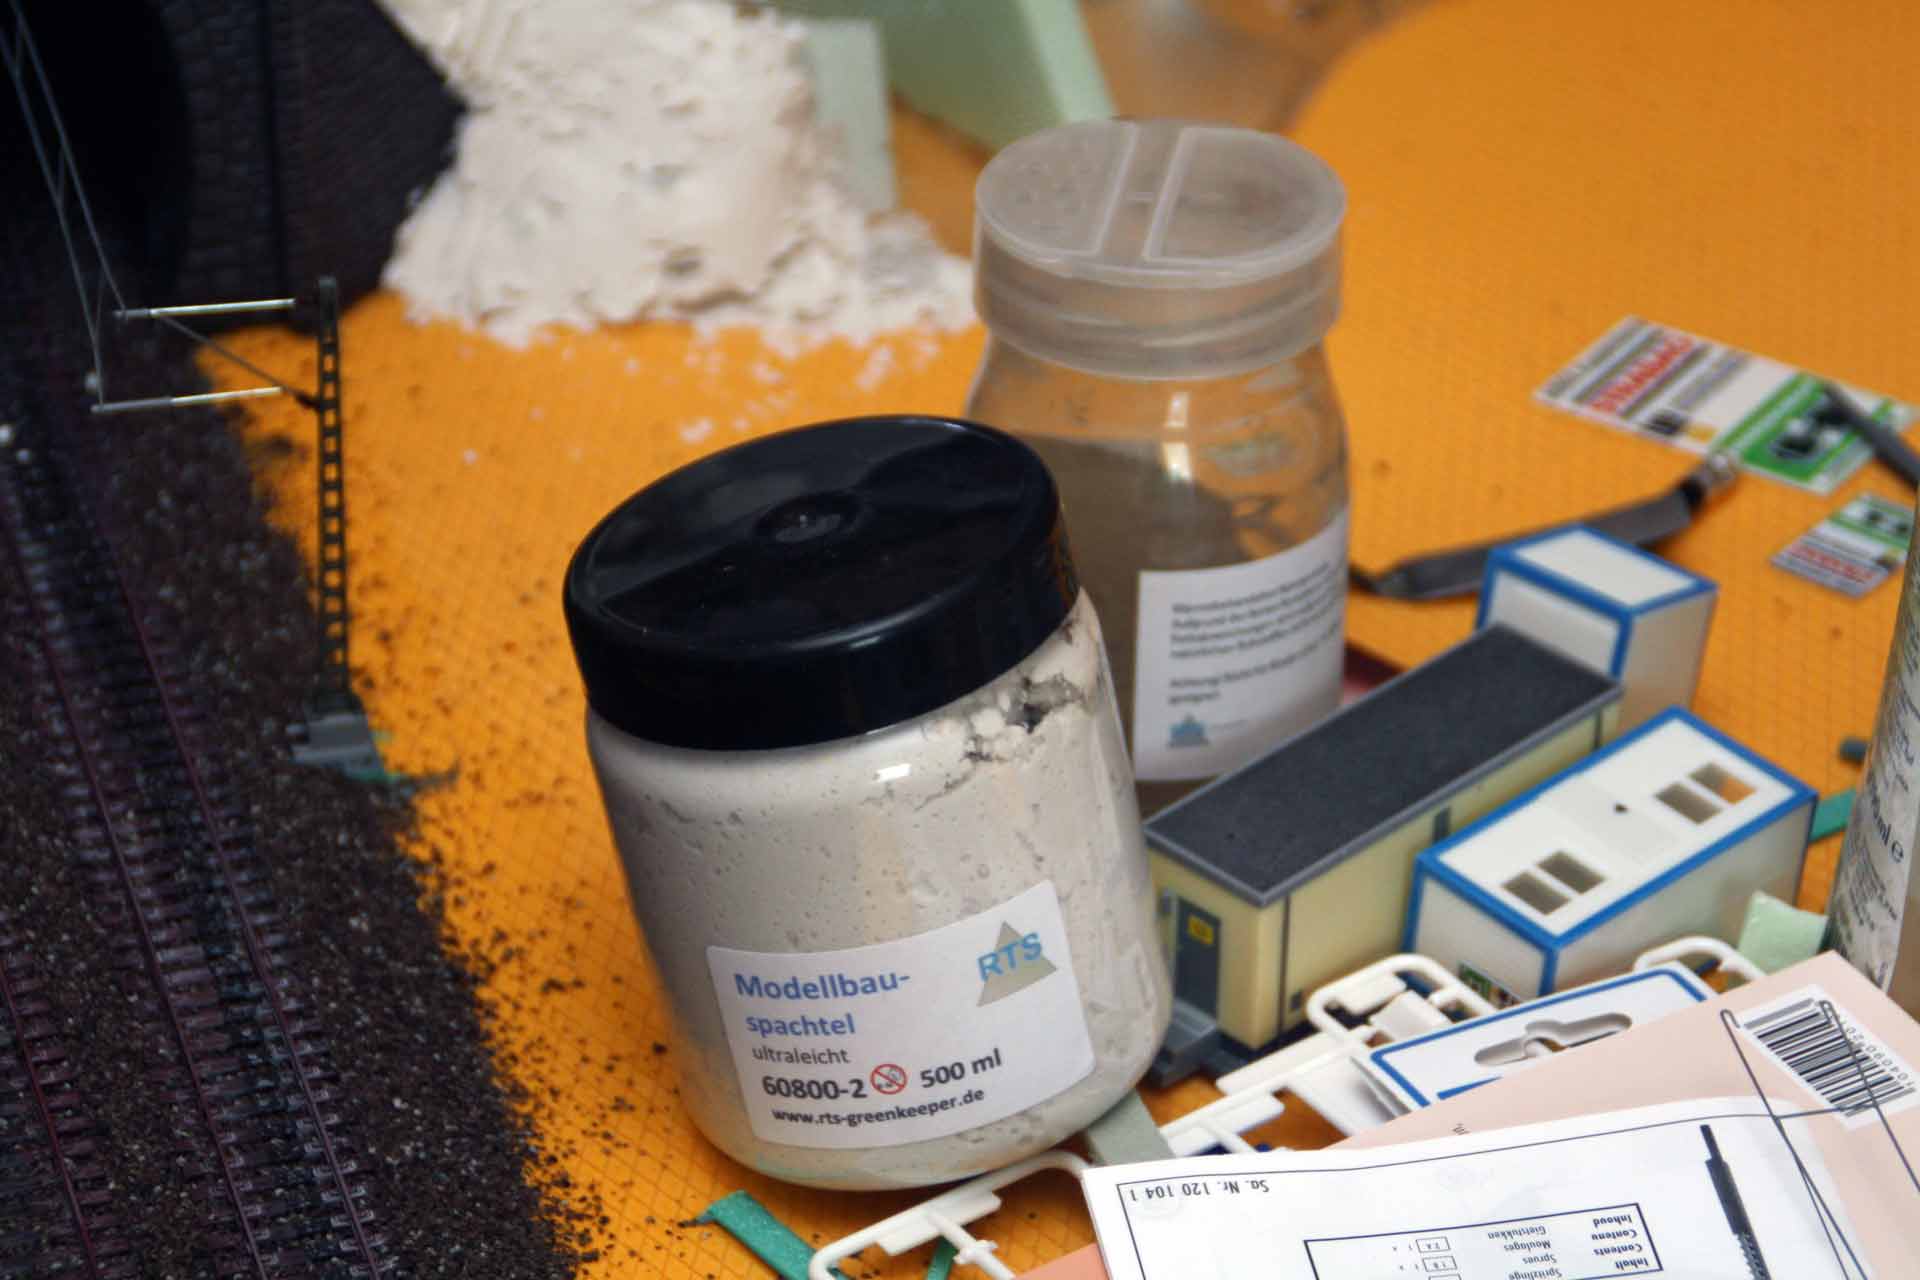
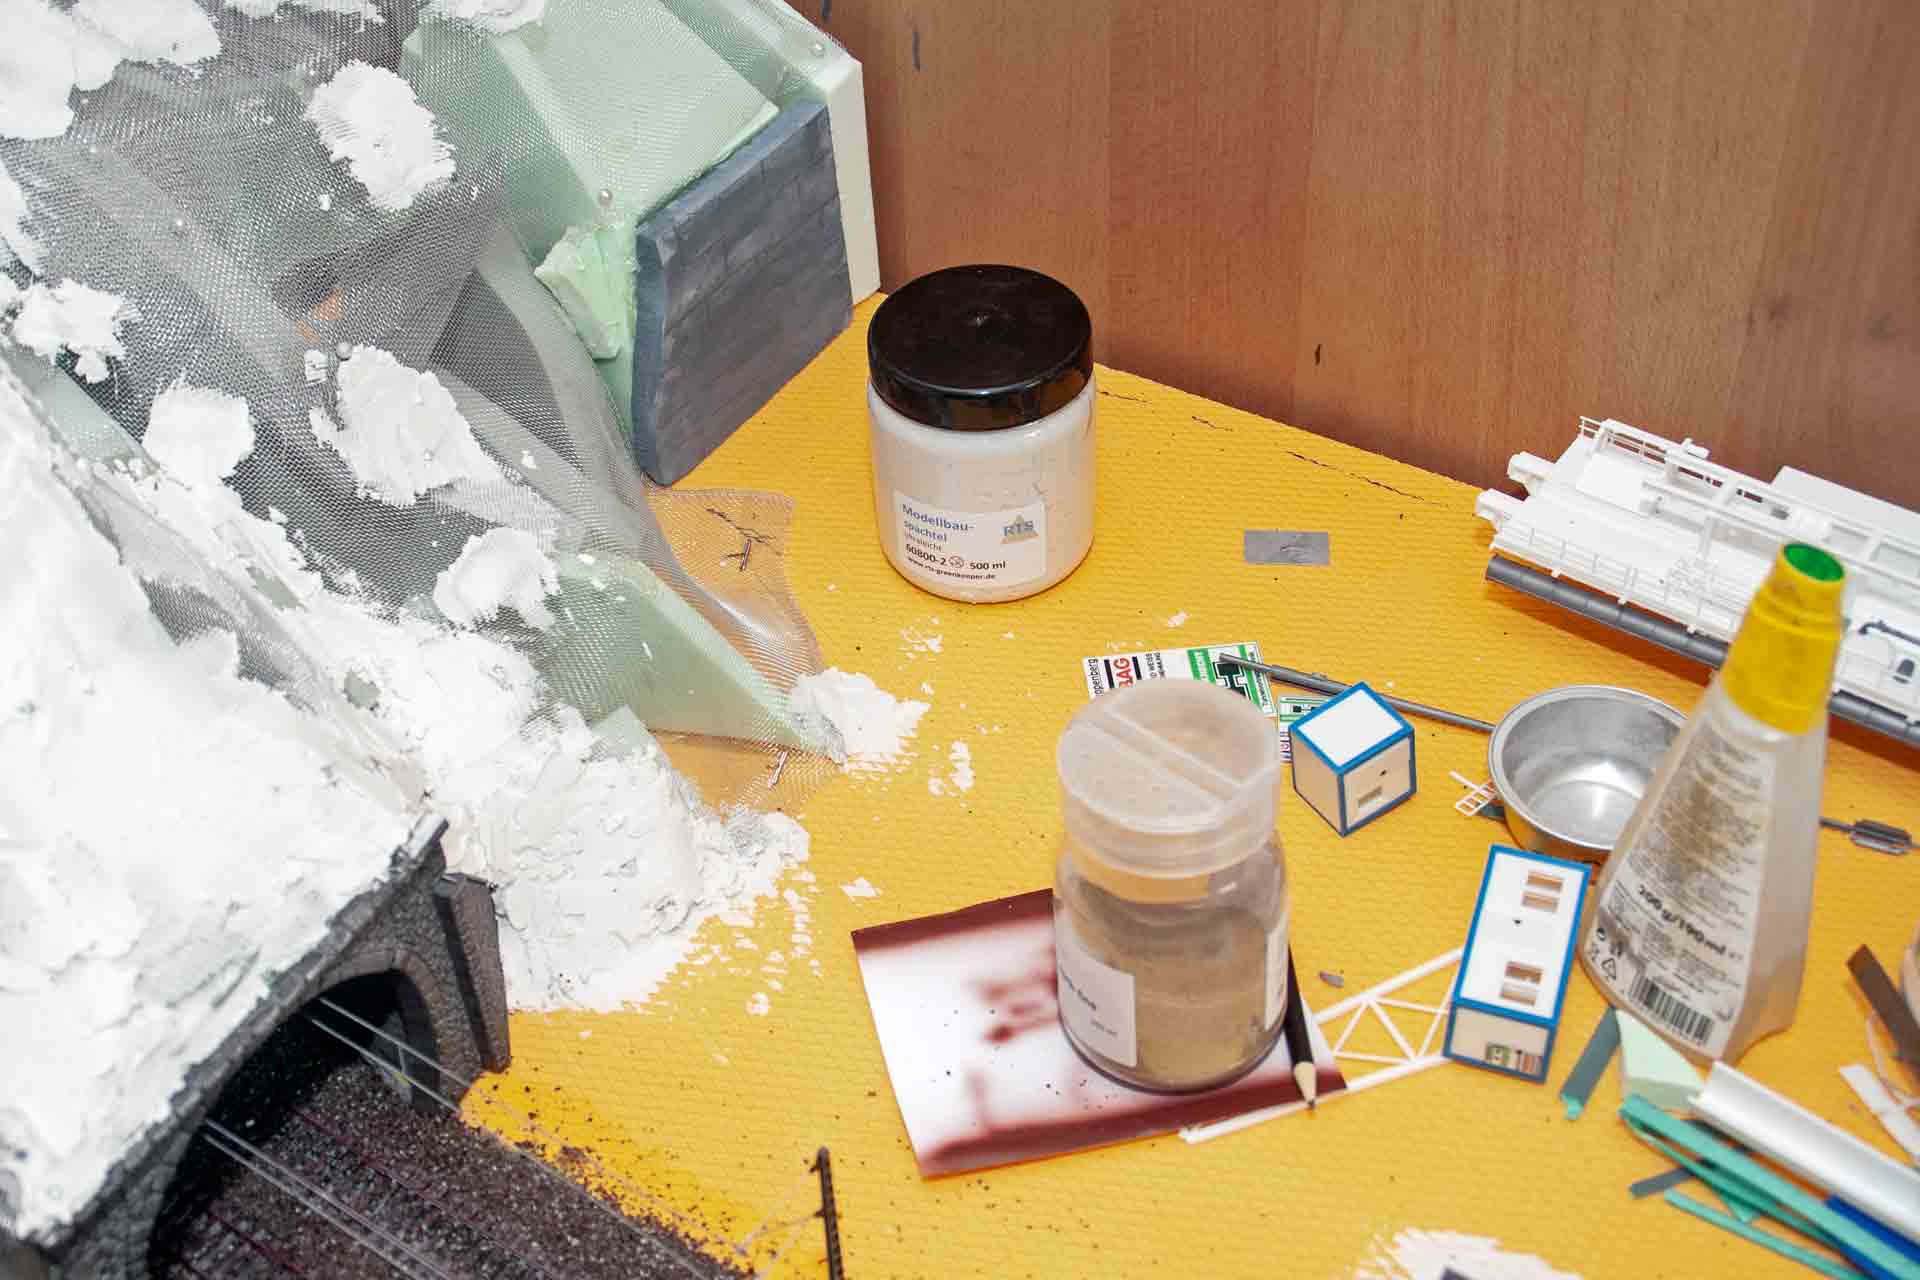
The areas of visible rock are further processed with the ultra-light filler. In addition, small, individual limestone chips are pressed into the still soft filler to achieve an even more realistic rendering of rock. After drying, both the modelled and the real stones are painted with highly diluted acrylic paints and washed until the impression of a natural rock face is created. Once everything is dry, the areas earmarked to become mountain meadow are coated with grass glue and then flocked with RTS-Greenkeeper 35kV in different late summer and early fall tones. In order to imitate different growth heights, Vang fixing glue is sprayed onto some areas after the initial flocking and re-flocked. This is repeated until the desired effect is achieved.
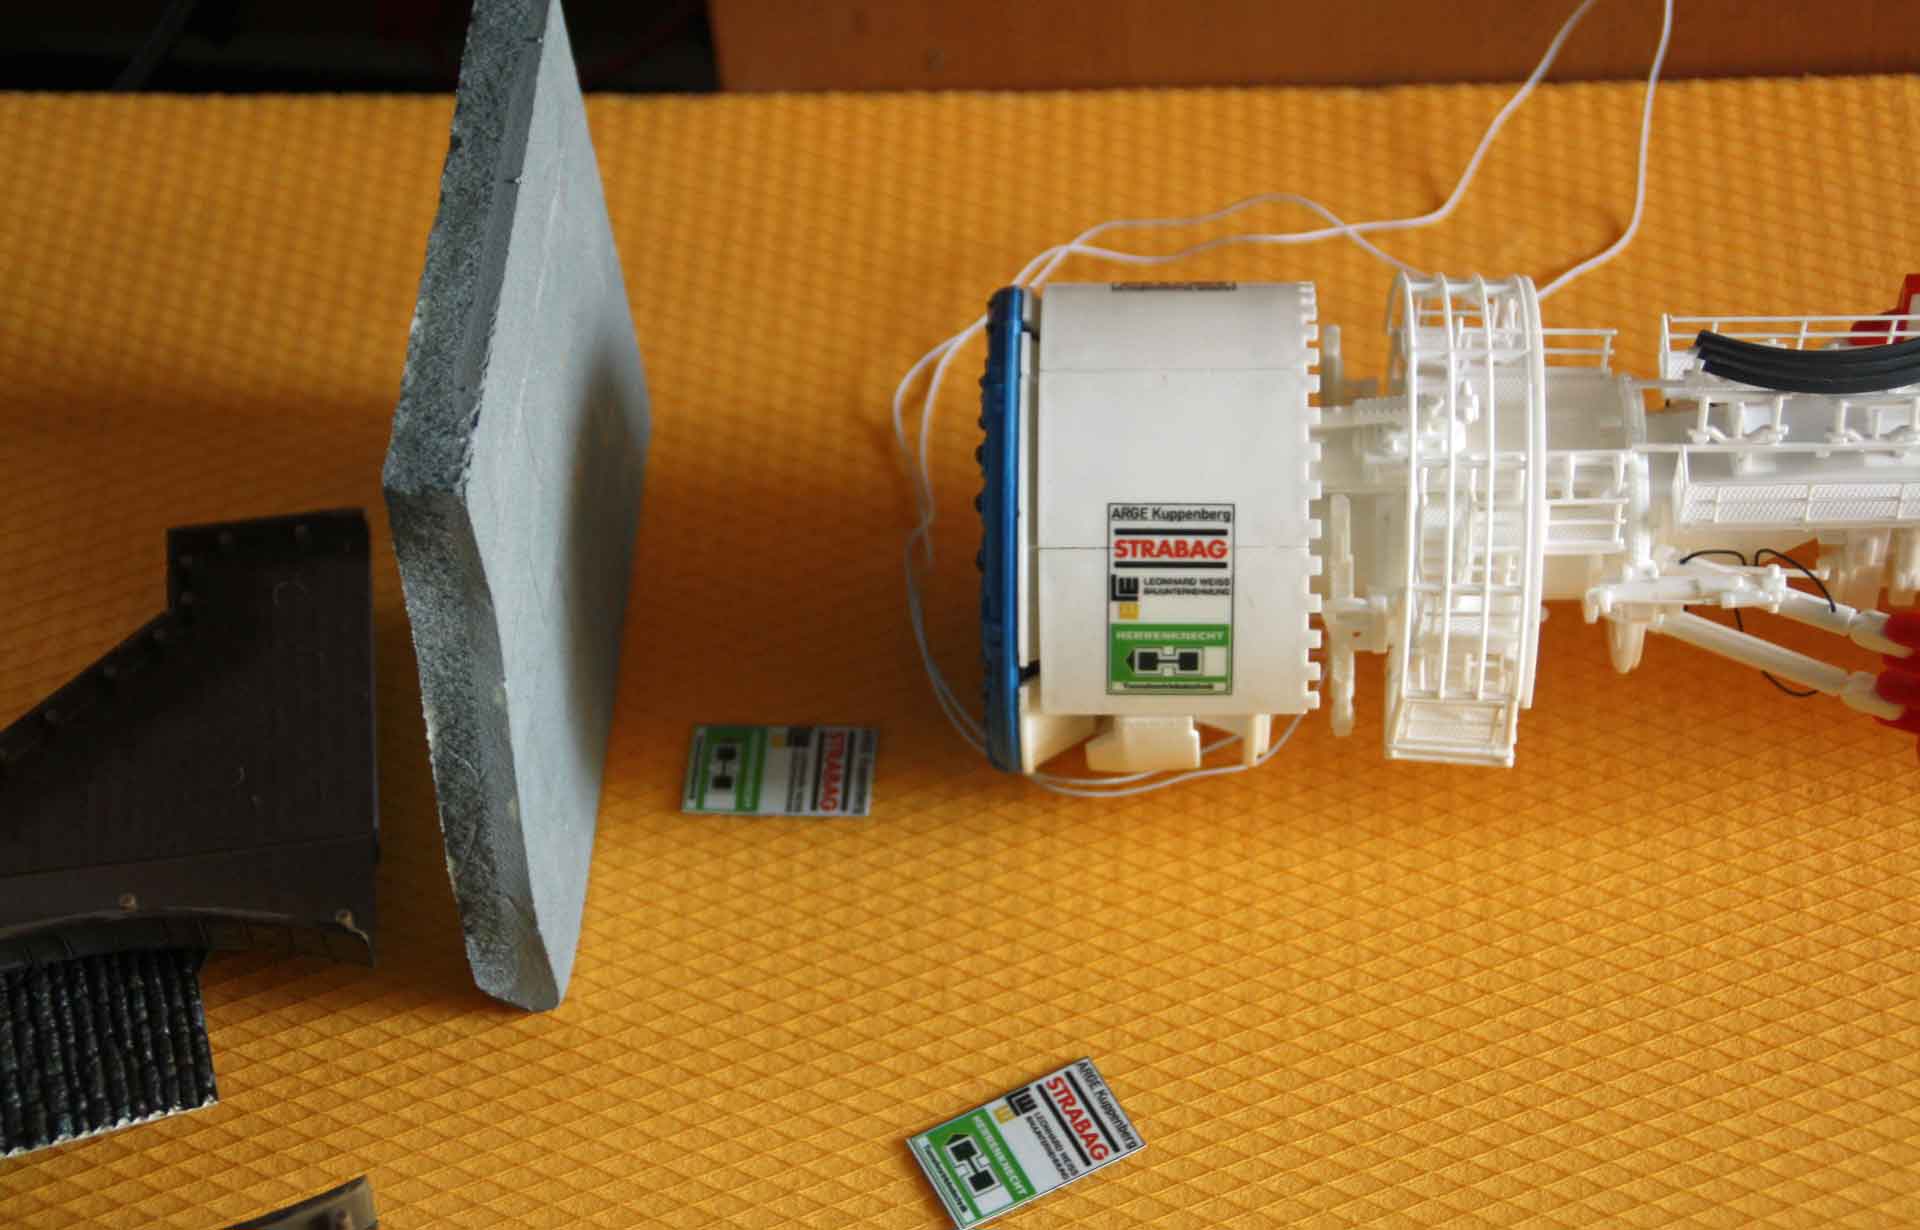
The boring slab
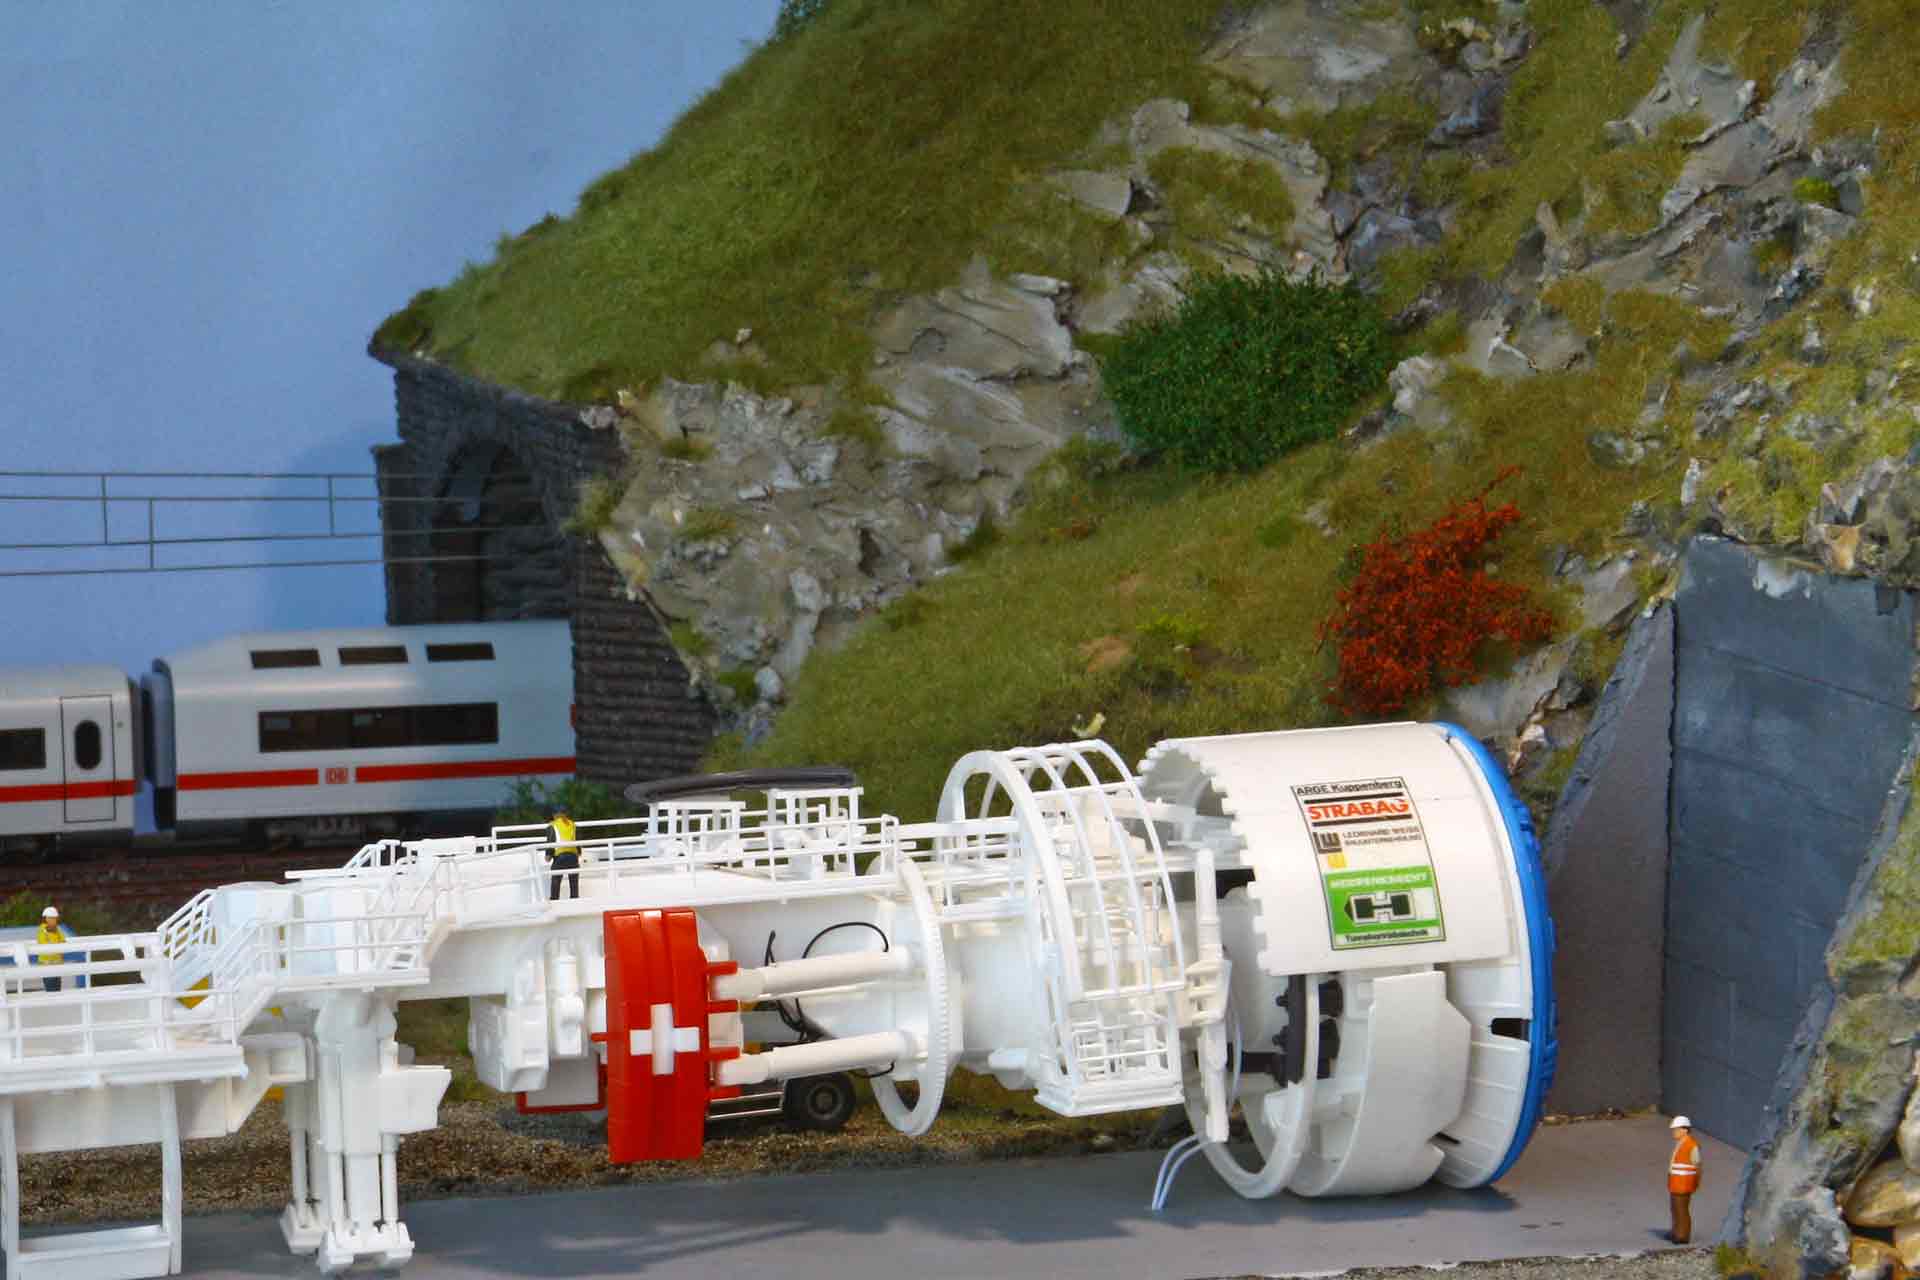
In order to be able to set up the tunnel boring machine for boring, i.e. beginning to drive the new tunnel, a solid base plate is needed. As a rule, a concrete slab is cast for this purpose. This is rendered using 3 mm thick polystyrene plates, which are cut to the width of the tunnel boring machine and glued to the base plate from the future tunnel mouth to the end of the tunnel boring machine using solvent-free all-purpose adhesive. Once the glue has dried, paint is applied using an airbrush and acrylic paints in various shades of gray.
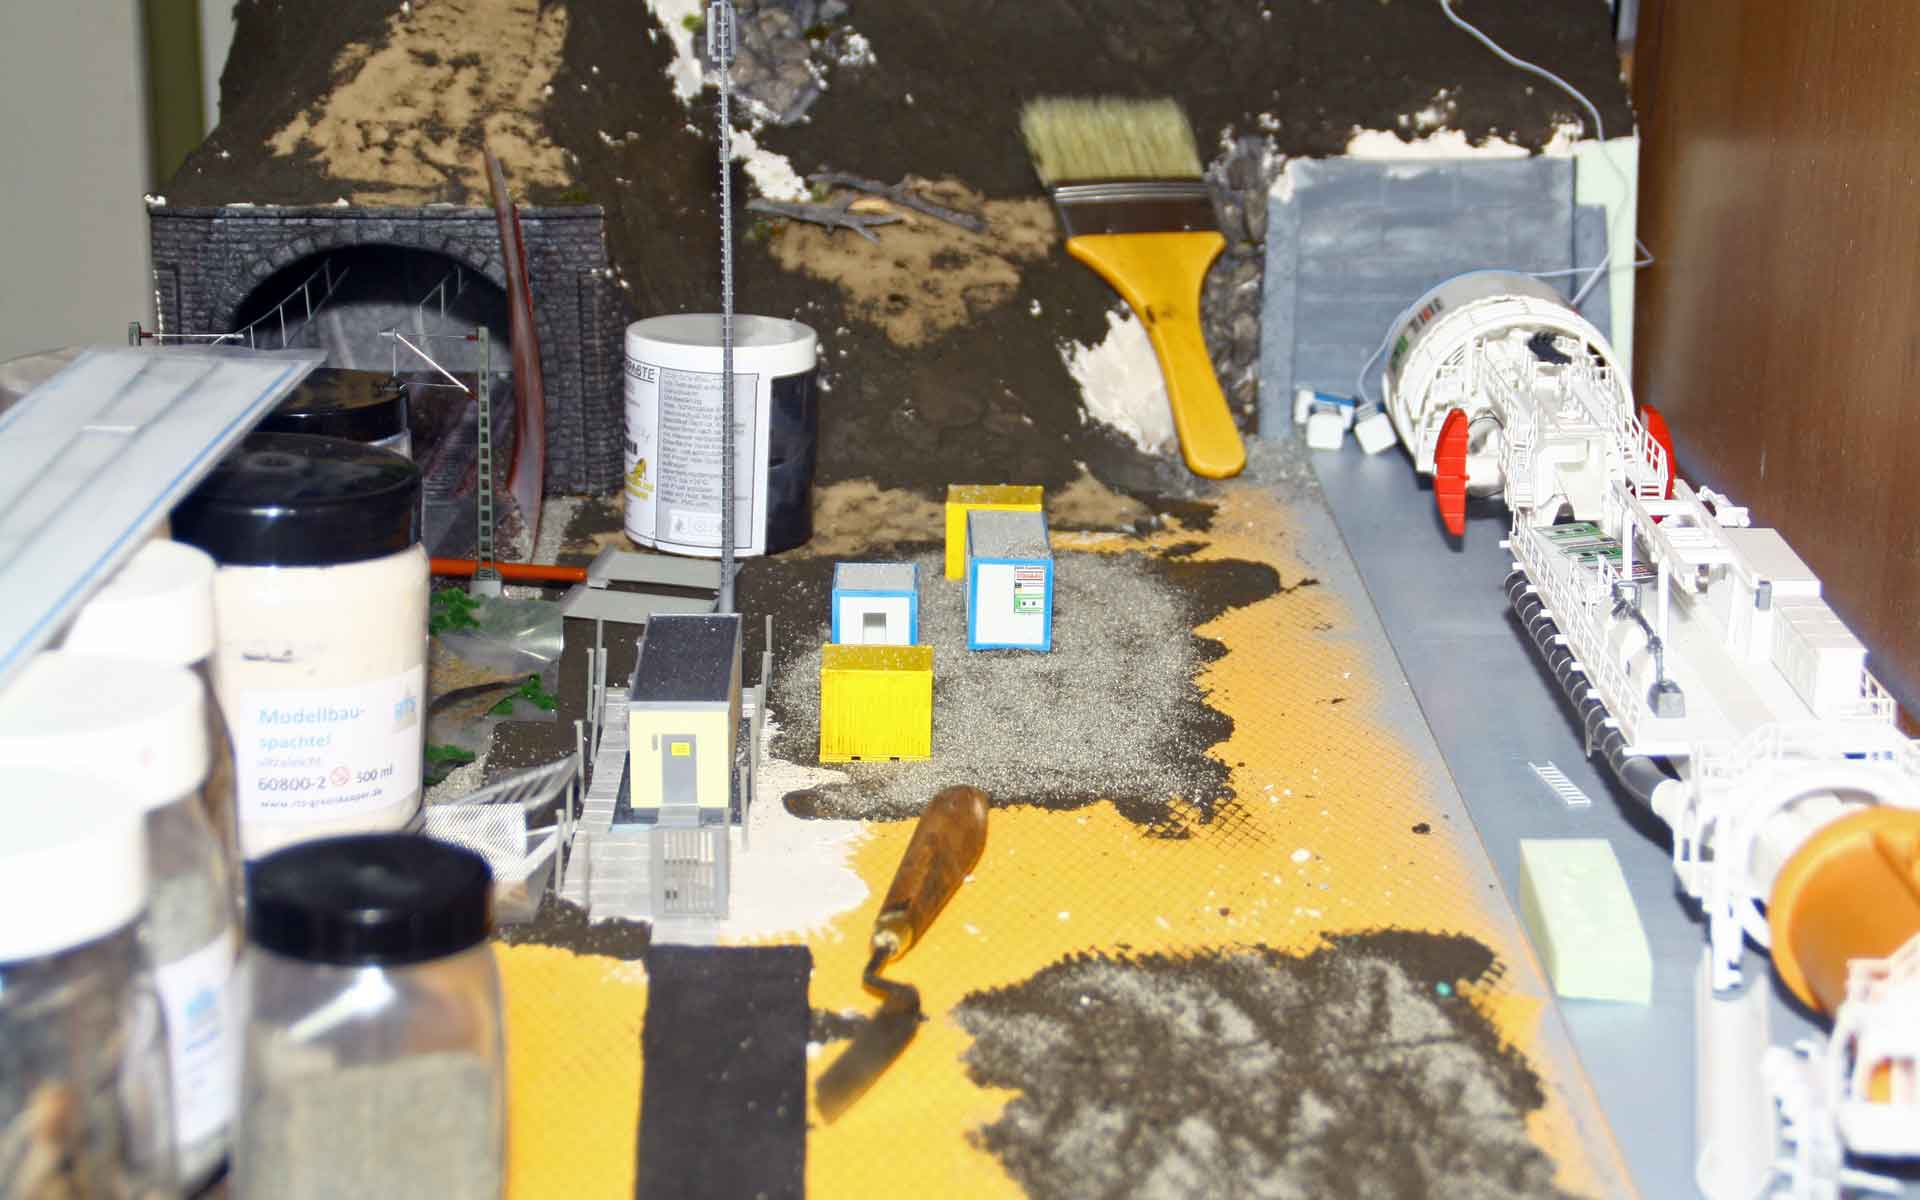
Signal box and access road
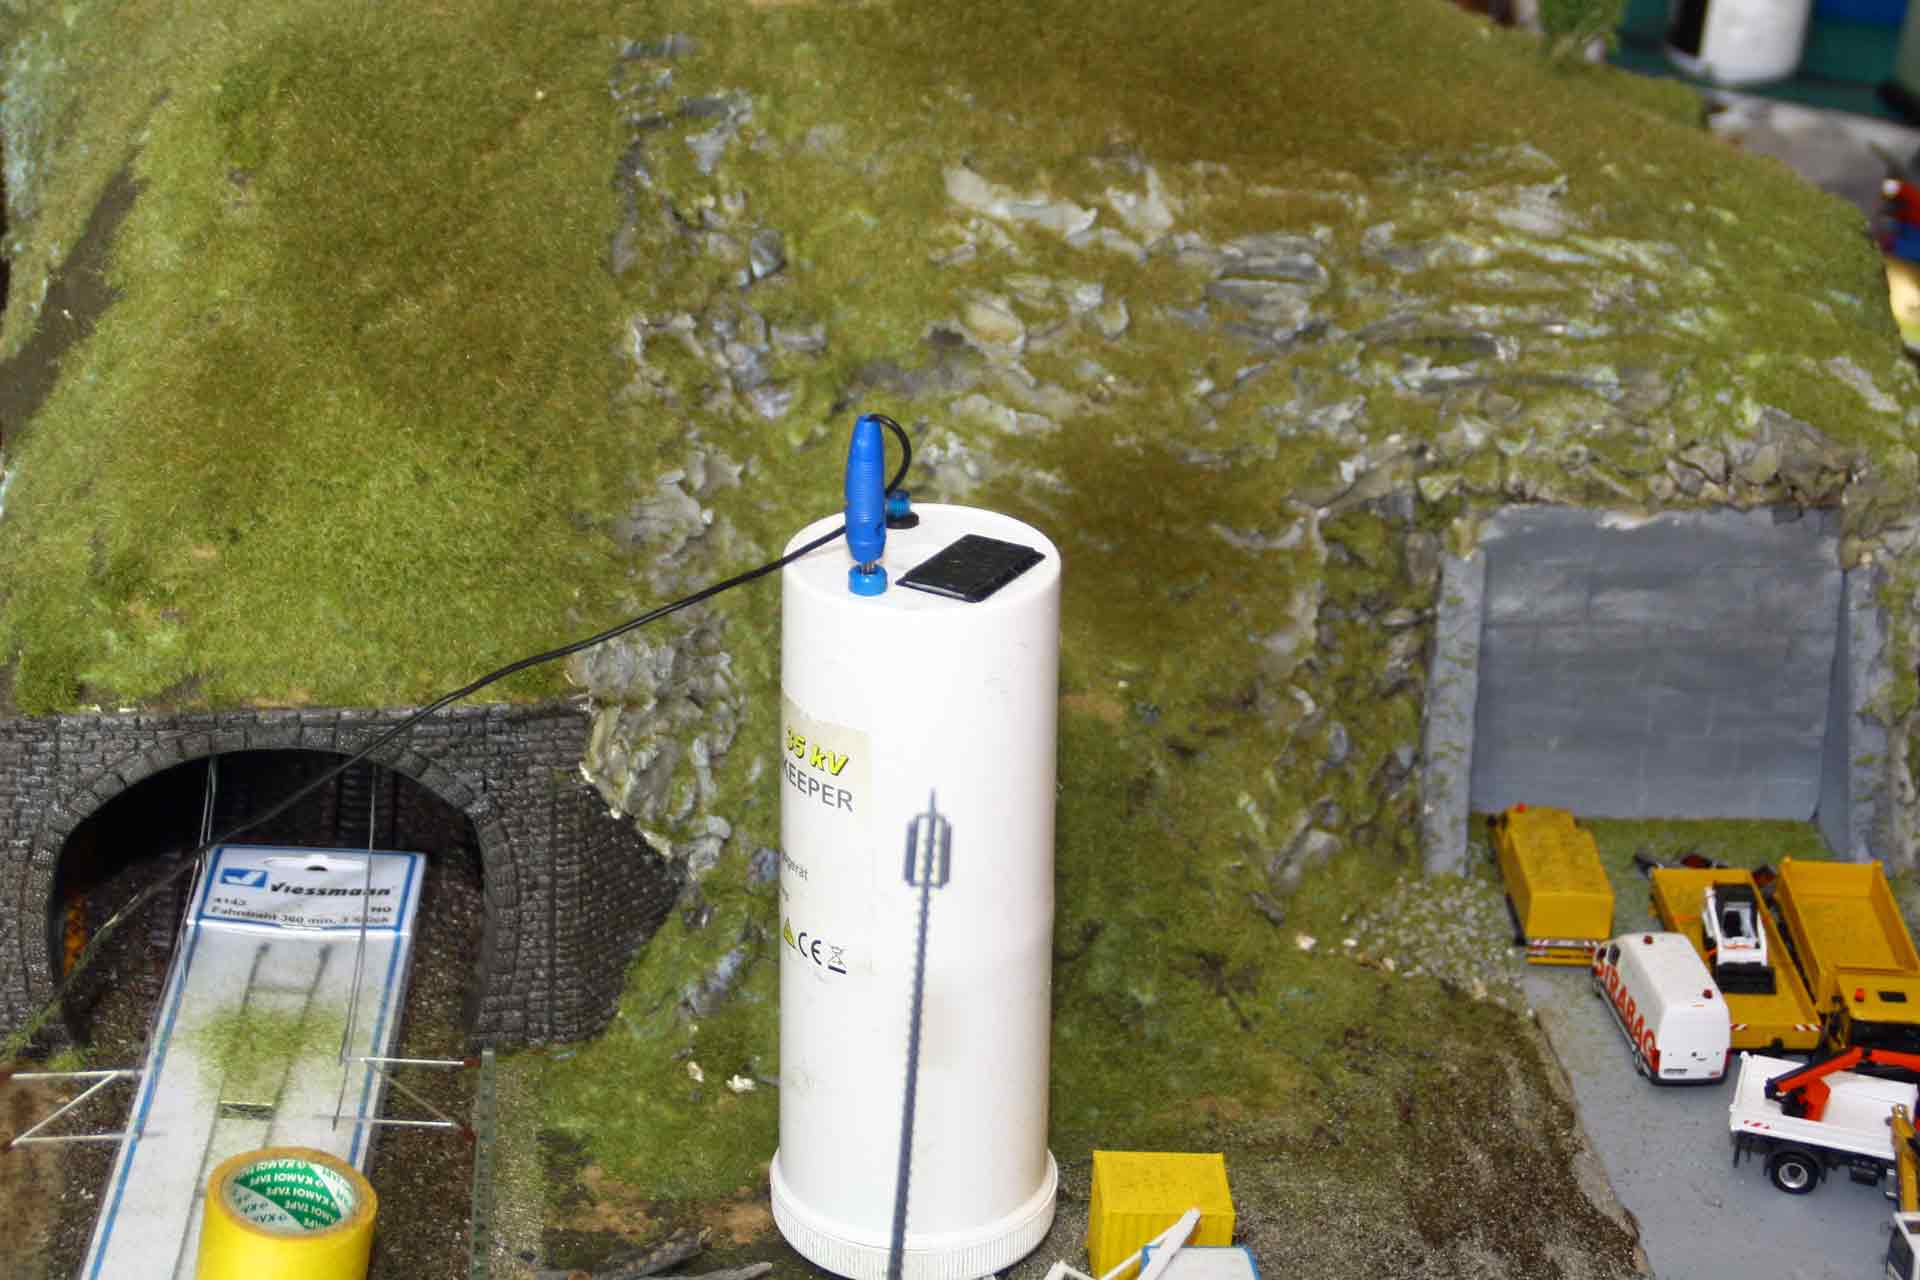
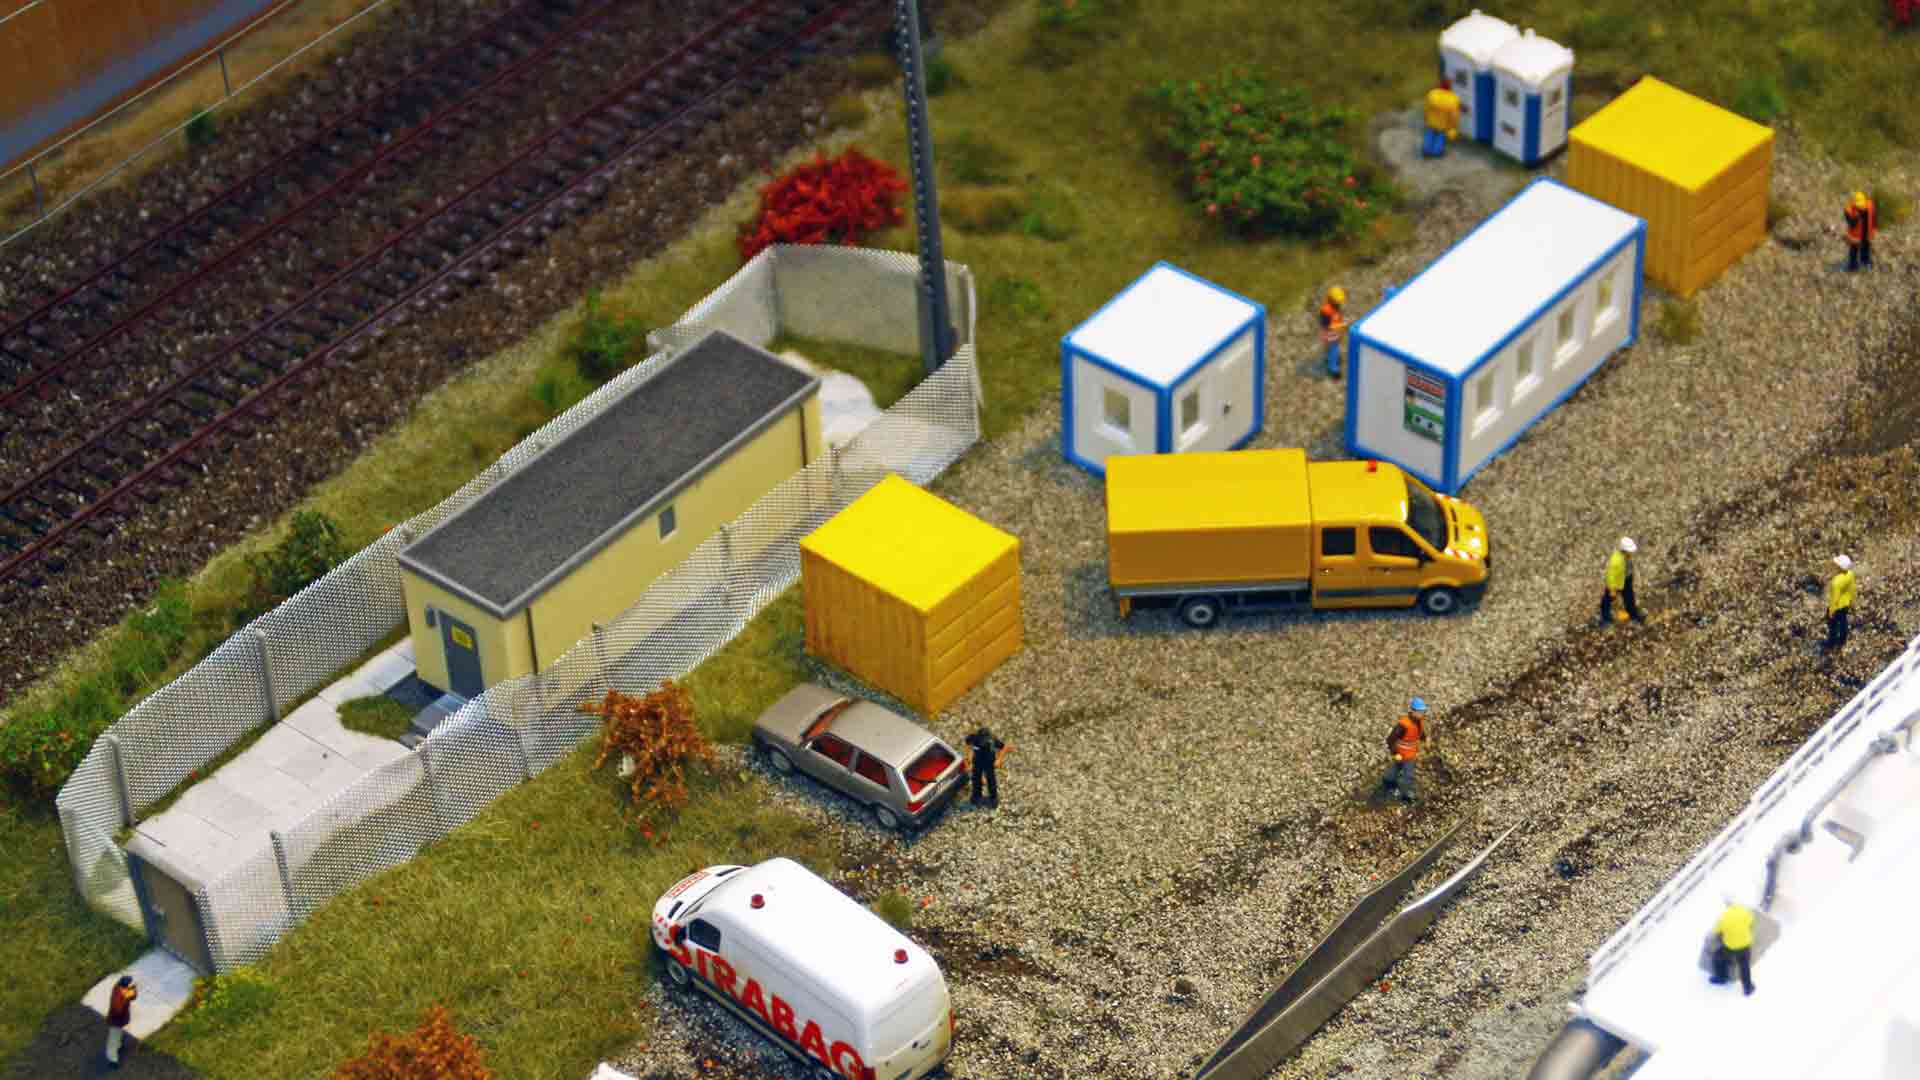
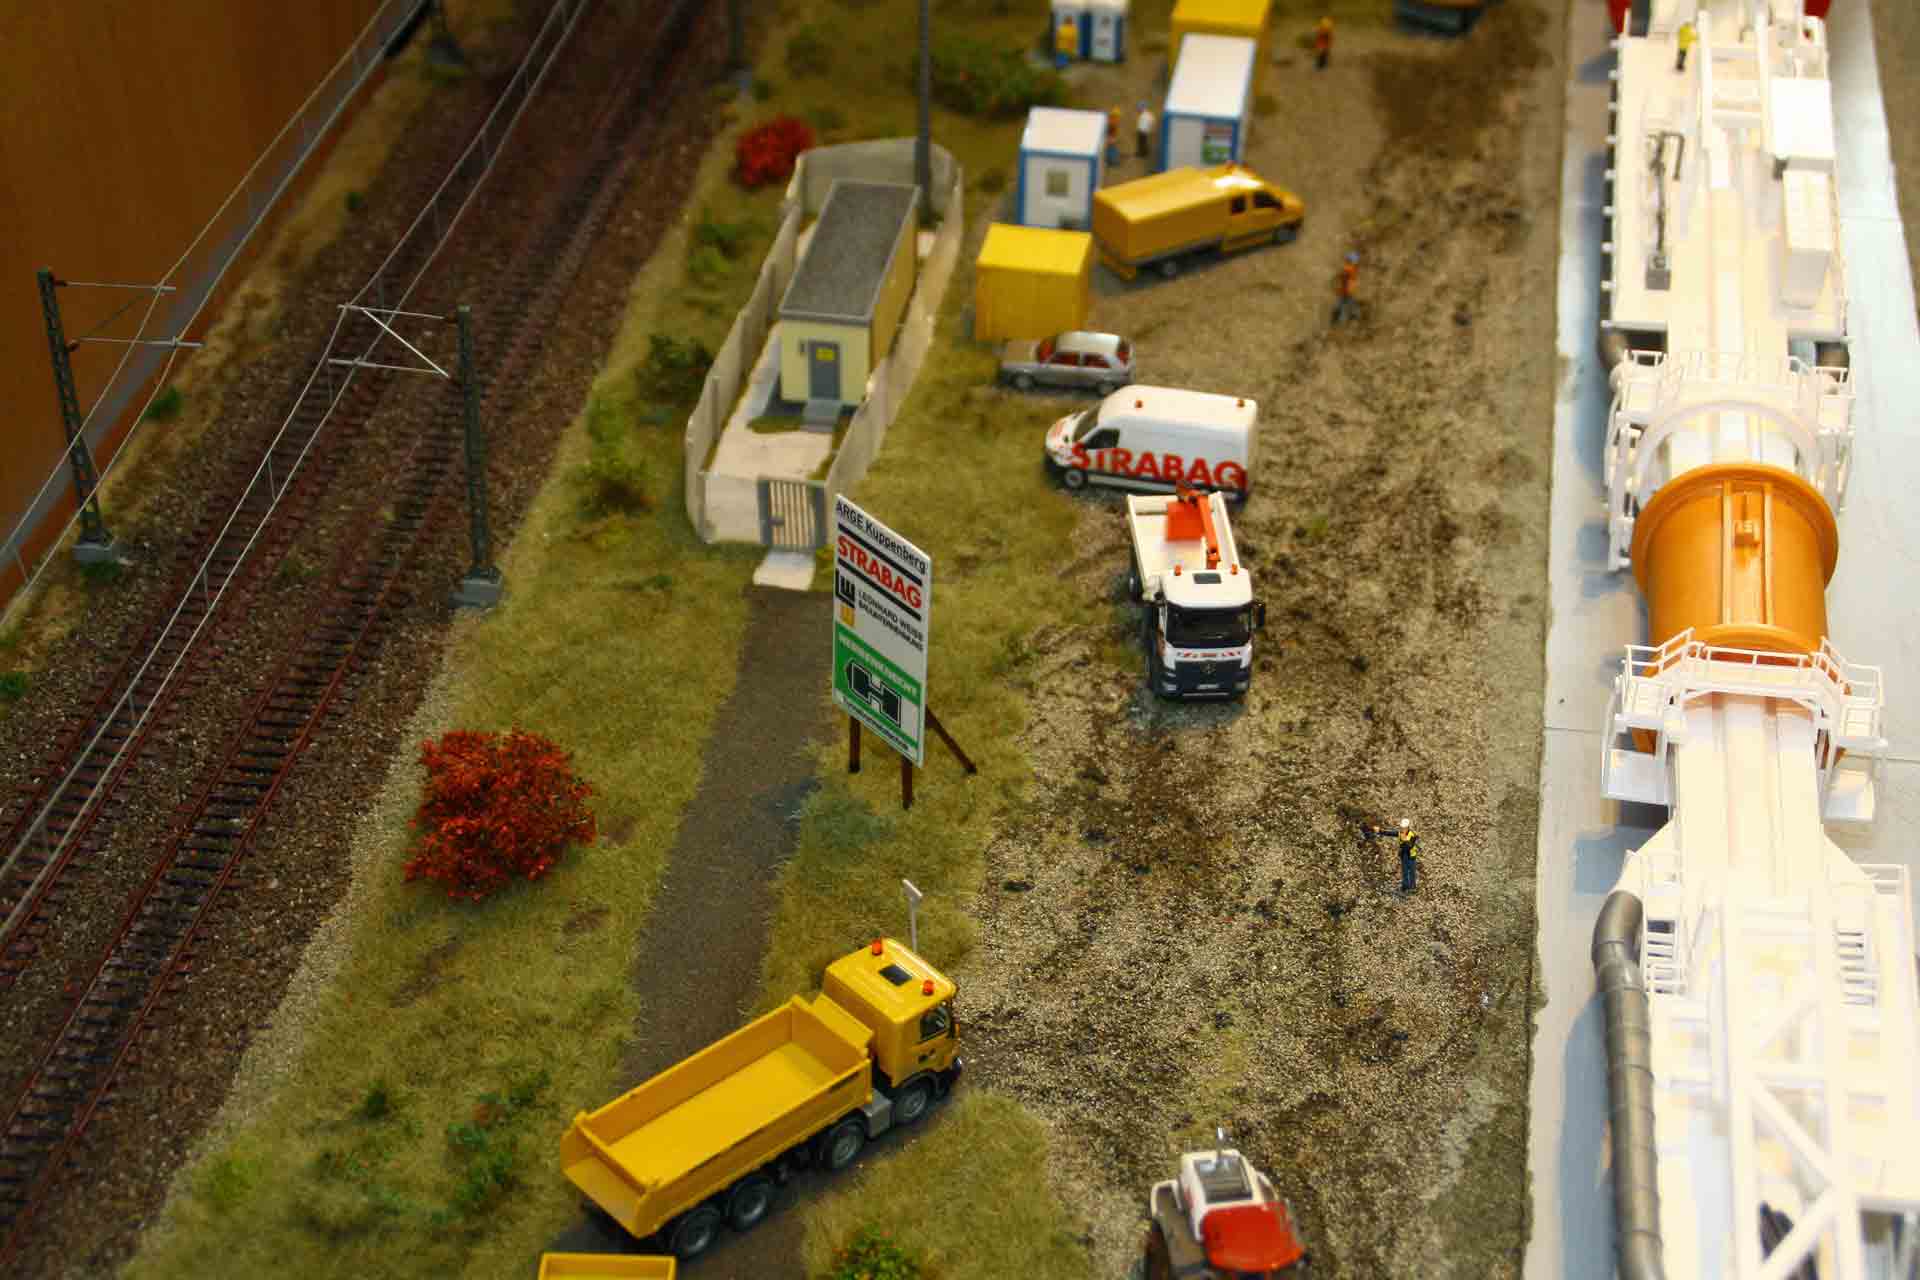
The prefabricated electronic signal box is positioned and installed at some distance from the existing railroad line. It is then complemented with concrete slabs from Juweela - from the access gate along the building to the rear entrance. In addition, fence posts, to which a wire mesh fence will later be attached, are set up around the signal box using superglue. The fence is from the Busch range. Once the fence posts are properly fixed, grass fiber is flocked between the paving slabs and the fence, being stuck into the adhesive using RTS Greenkeeper. Finally, the signal box’s radio mast is installed and glued in place. The small access road to the construction site and signal box is created using "granite gray" repair paste from Joker Rügen.
Construction site design
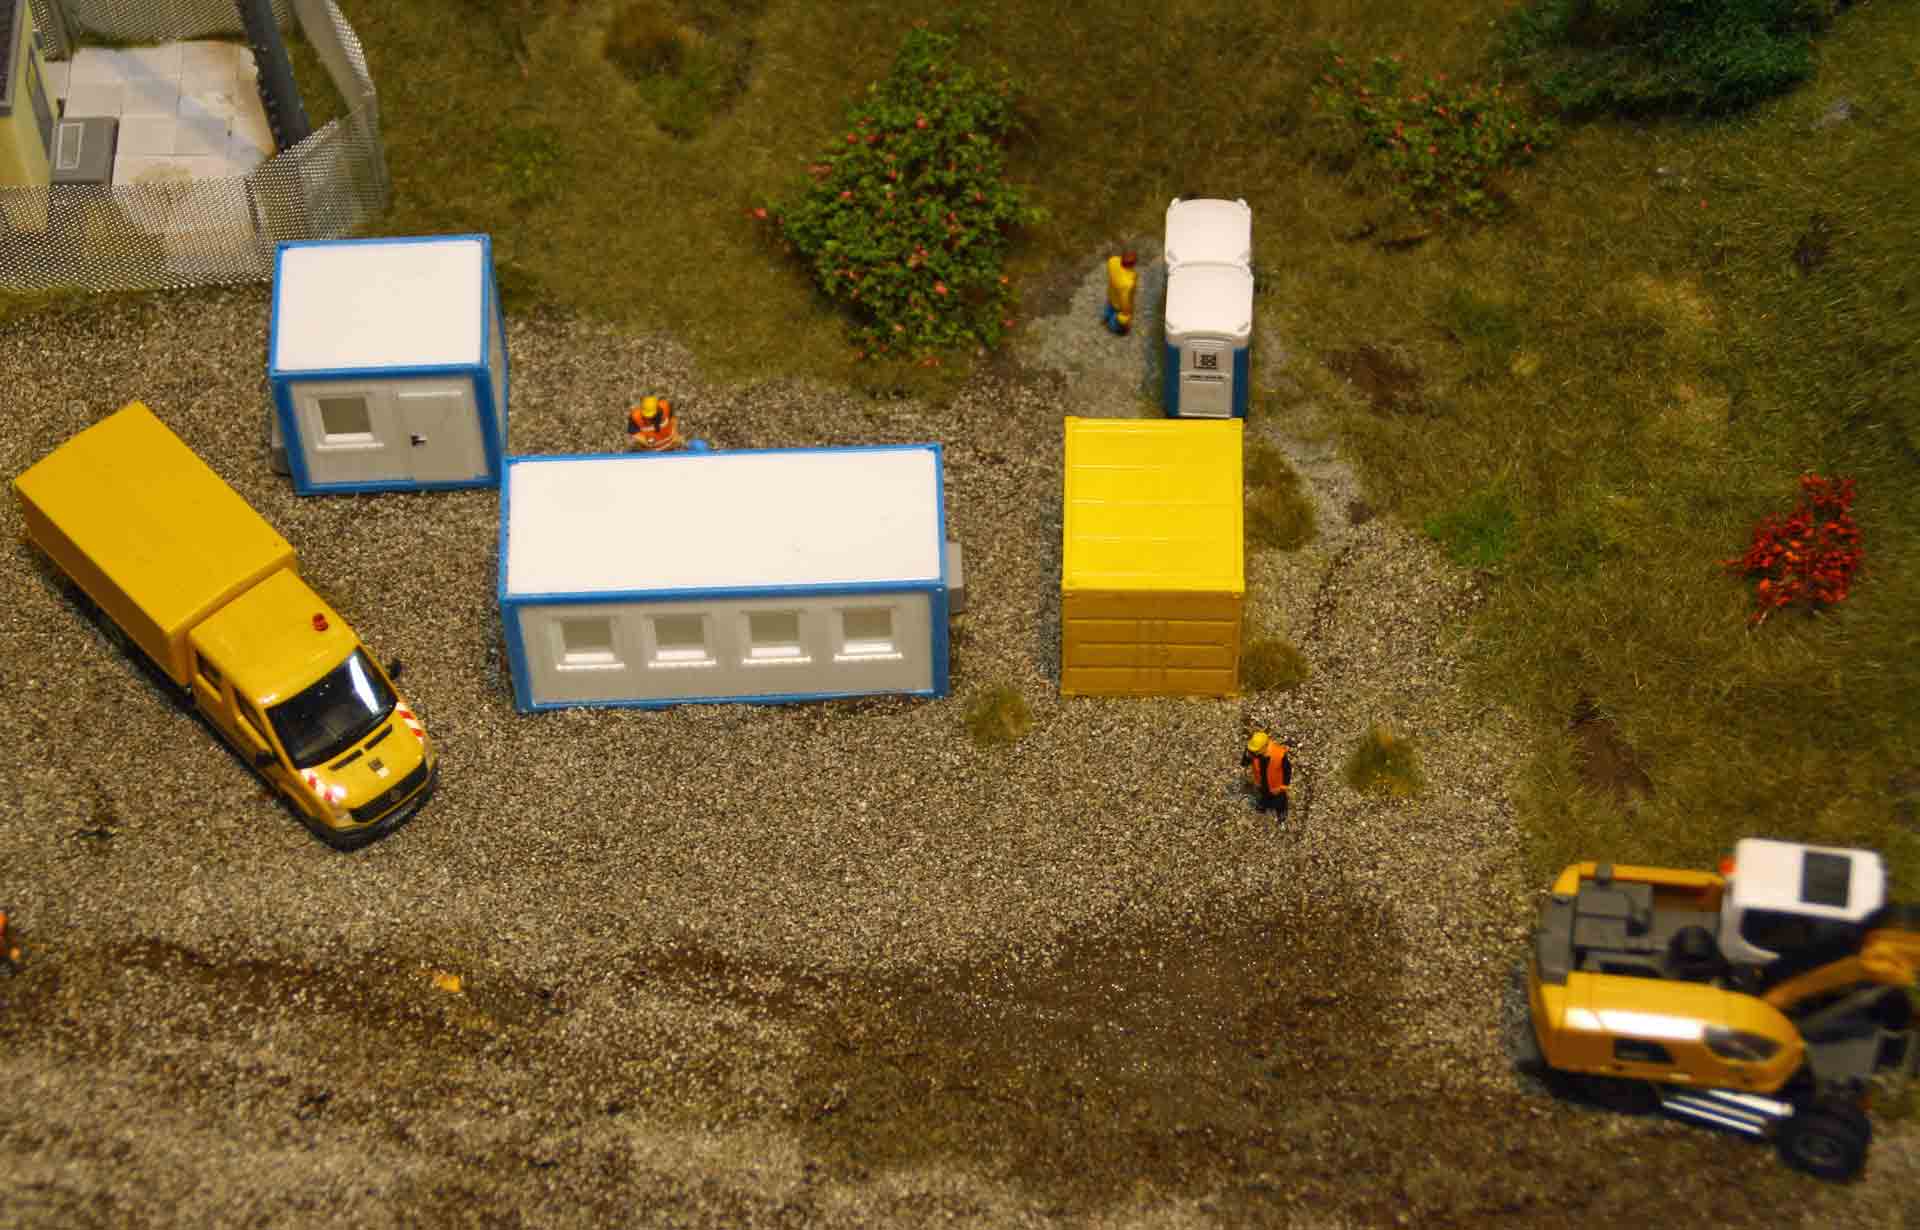
Limited by the dimensions of the base plate and the tunnel boring machine itself, only a small part of the construction site can be represented on the diorama. Dark Earth texture paste is applied and smoothed with a fine spatula to the area where the construction containers and toilet blocks will later be located. The containers should then be placed in their intended location. The still damp texture paste is sprinkled with fine chippings from Minitec to give the impression of a gravel surface. The remaining area of the planned construction site is then treated in the same way and sprinkled with fine gravel. In addition, various wheel sets and a small model car are used to imprint tracks into the still damp, sprinkled texture paste. The result is a muddy surface with signs of traffic - typical of a building site. A narrow strip remains free on both sides of the concrete slab. Fine track ballast from Asoa is applied to this strip in a previously applied bed of flocking adhesive and modeled. Everything must now be allowed to dry thoroughly before further work on the diorama can begin.
Landscaping
The still grass-free areas at the end of the hill and along the access road are flocked with grass fibers of different lengths using RTS-Greenkeeper. While the flocking dries, the Busch wire mesh fence is superglued to the already fixed fence posts around the signal box. As it consists of very fine aluminum mesh, a certain amount of care is required. Shrubs and filigree bushes from Mininatur have now found a home on the meadow areas, along the railroad line, and on the hillside. Only late summer and early fall varieties are used here. A wire fence is placed at the top of the hill, suggesting the fencing of a pasture. A hiker stands at the fence, observing the construction work in front of him. Small trunks of dead trees complete the design.
Some fine tuning
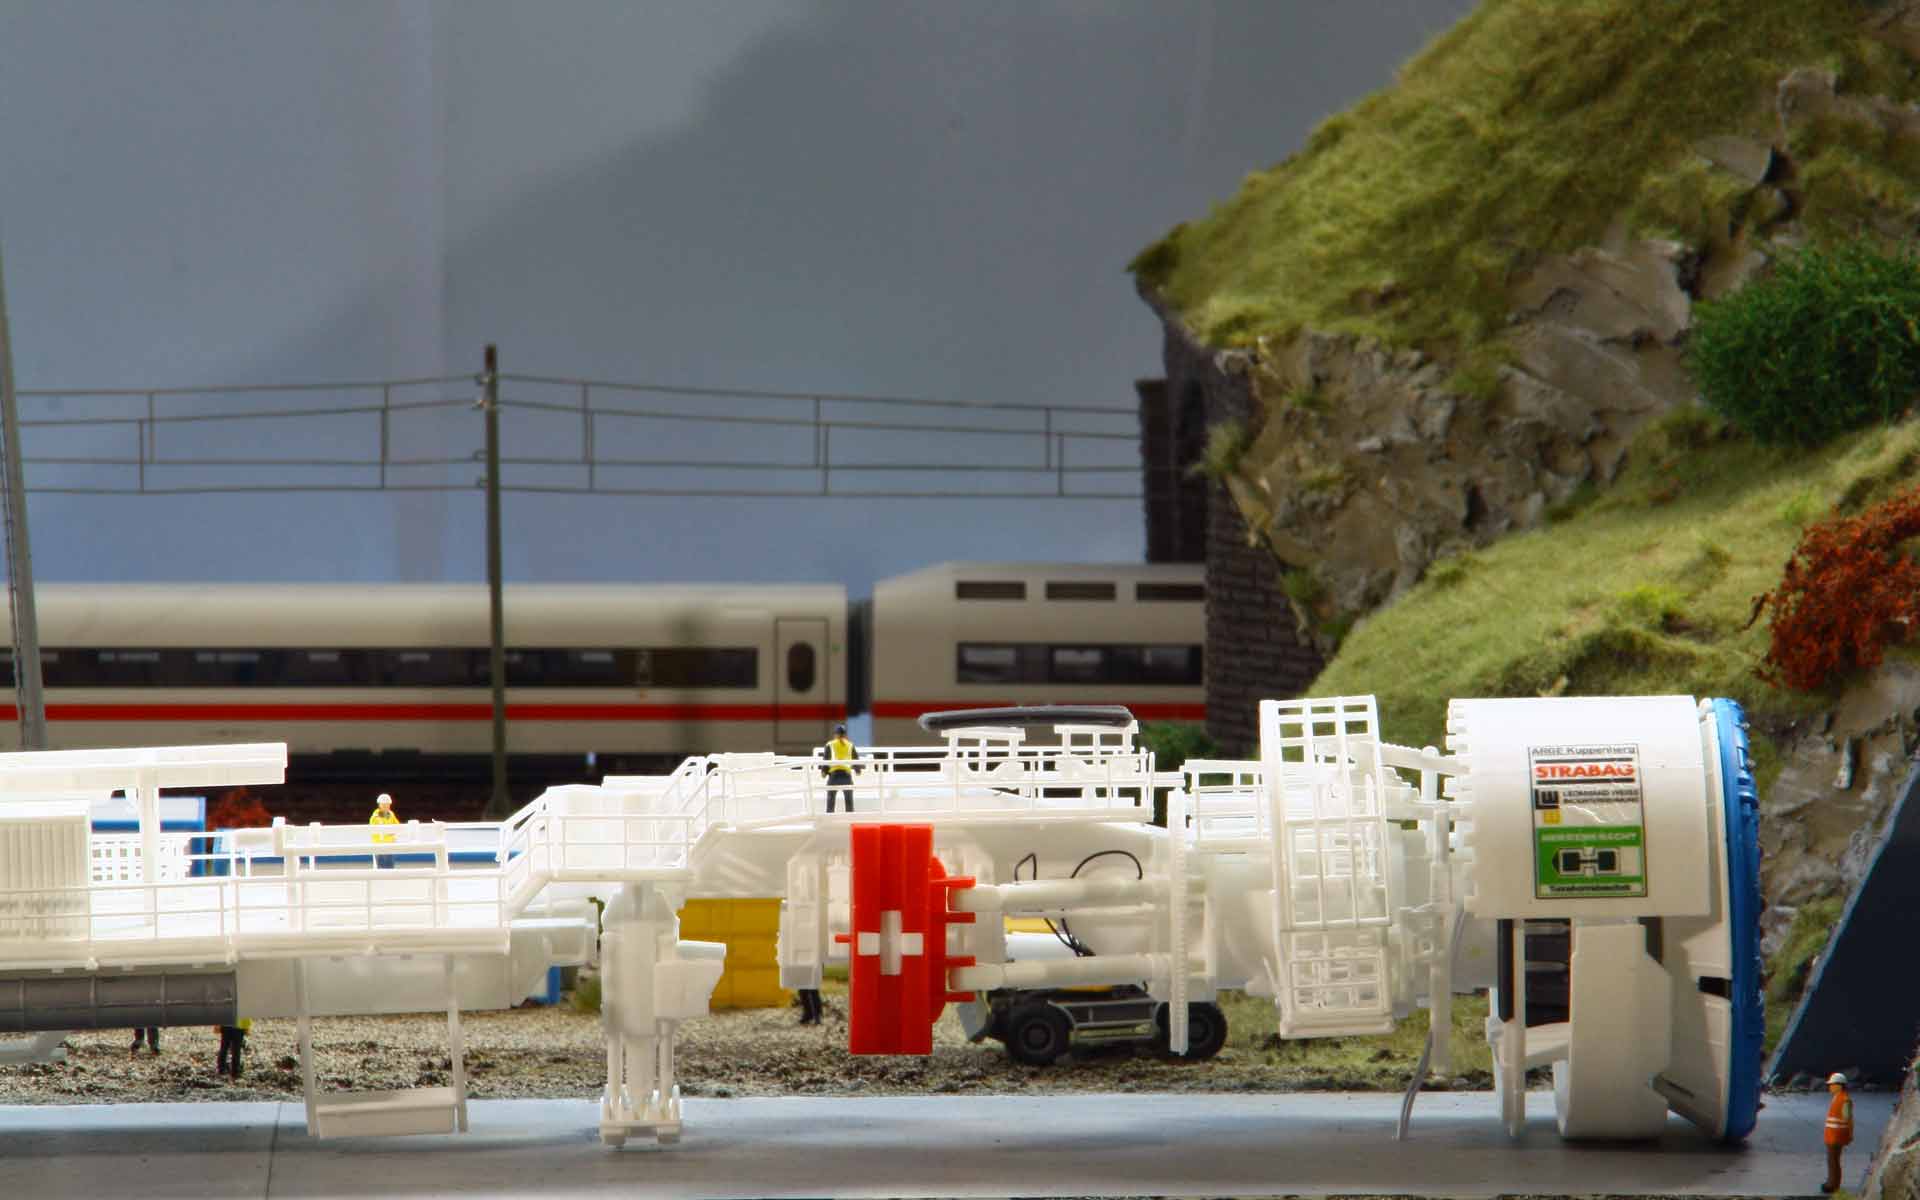
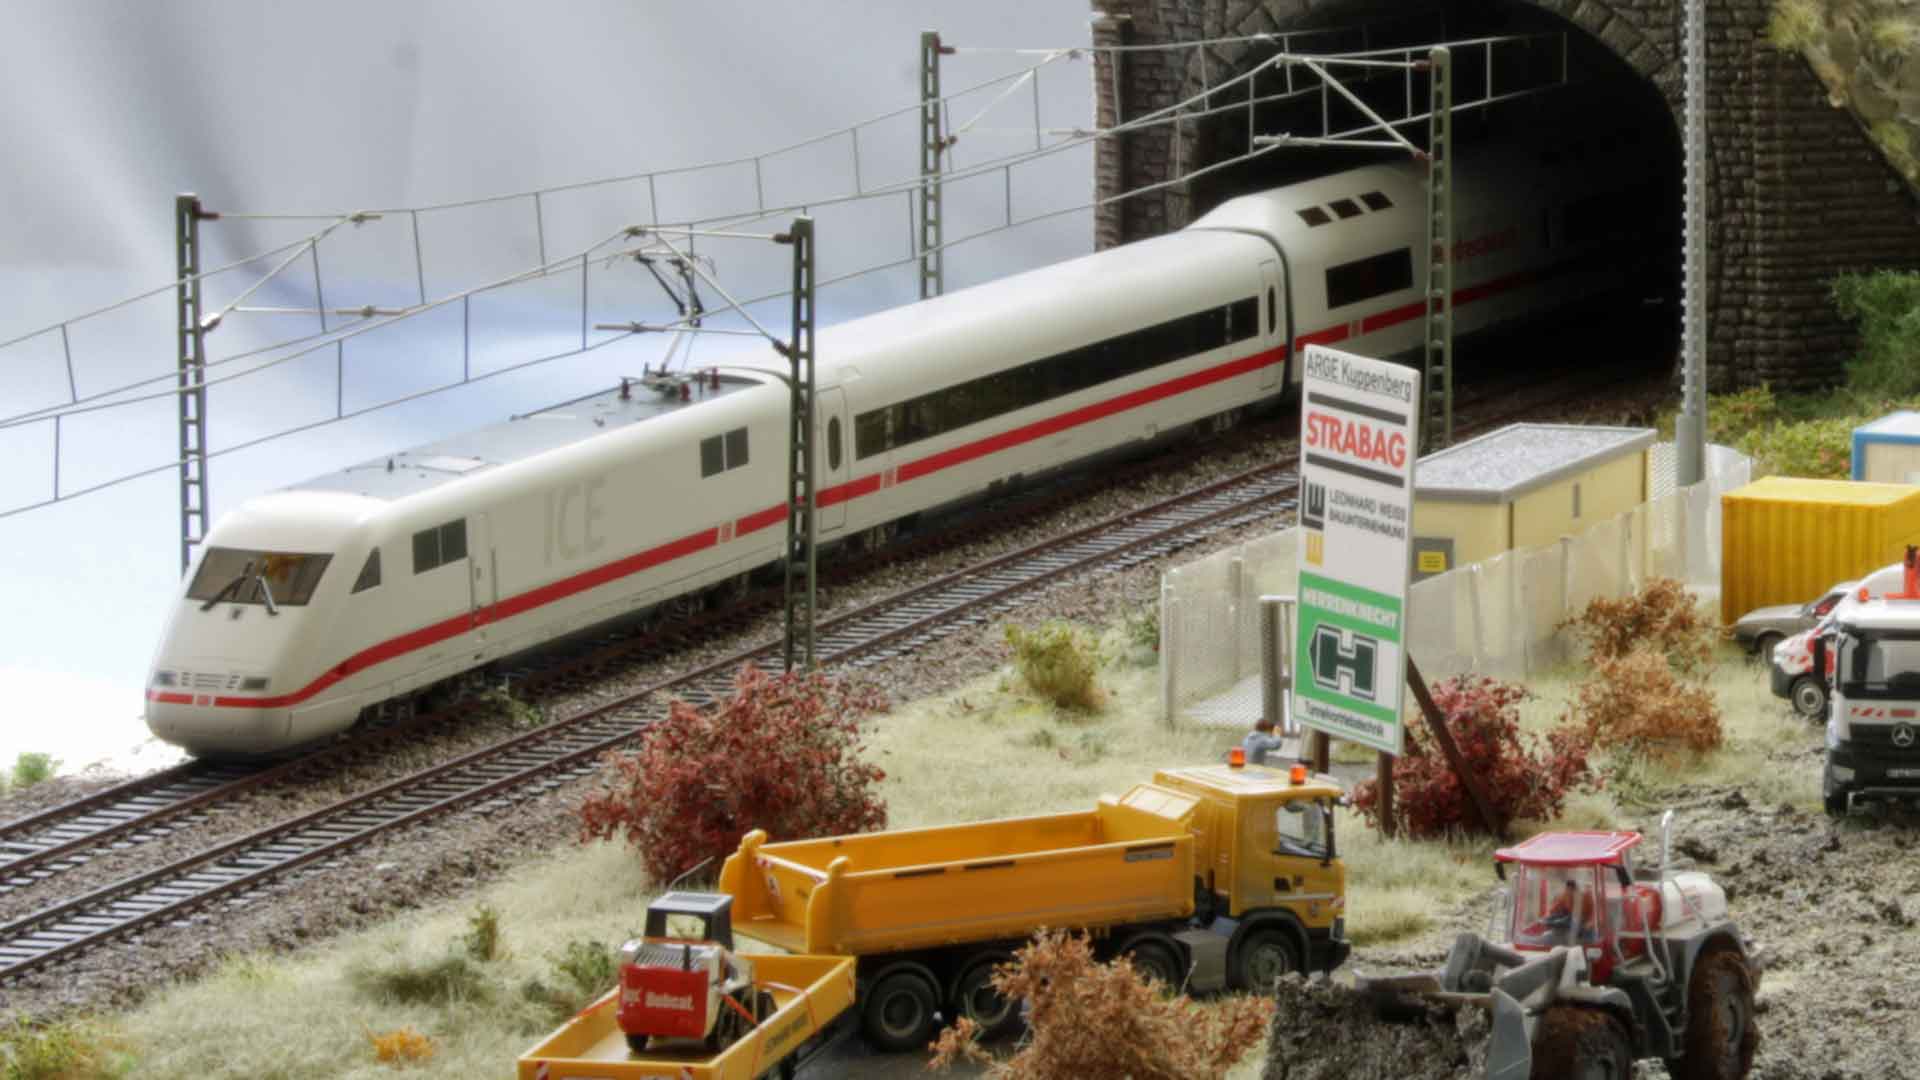
First, the drill head and the trailer of the tunnel boring machine are joined together, then placed on the concrete work surface and aligned. A few drops of superglue prevent them from slipping later. Some workers are busy on the machine itself, carrying out preparatory work for the start of drilling. Figures are also placed in various positions around the construction containers to create a vibrant scene. There are also security men at the entrance to the construction site and near the containers to protect this area of the site. Finally, the large construction site sign, on which all the companies involved in "ARGE Kuppenberg" (Herrenknecht, Strabag and Leonhard Weiss) are listed, is set up between the construction site access road and the signal box.
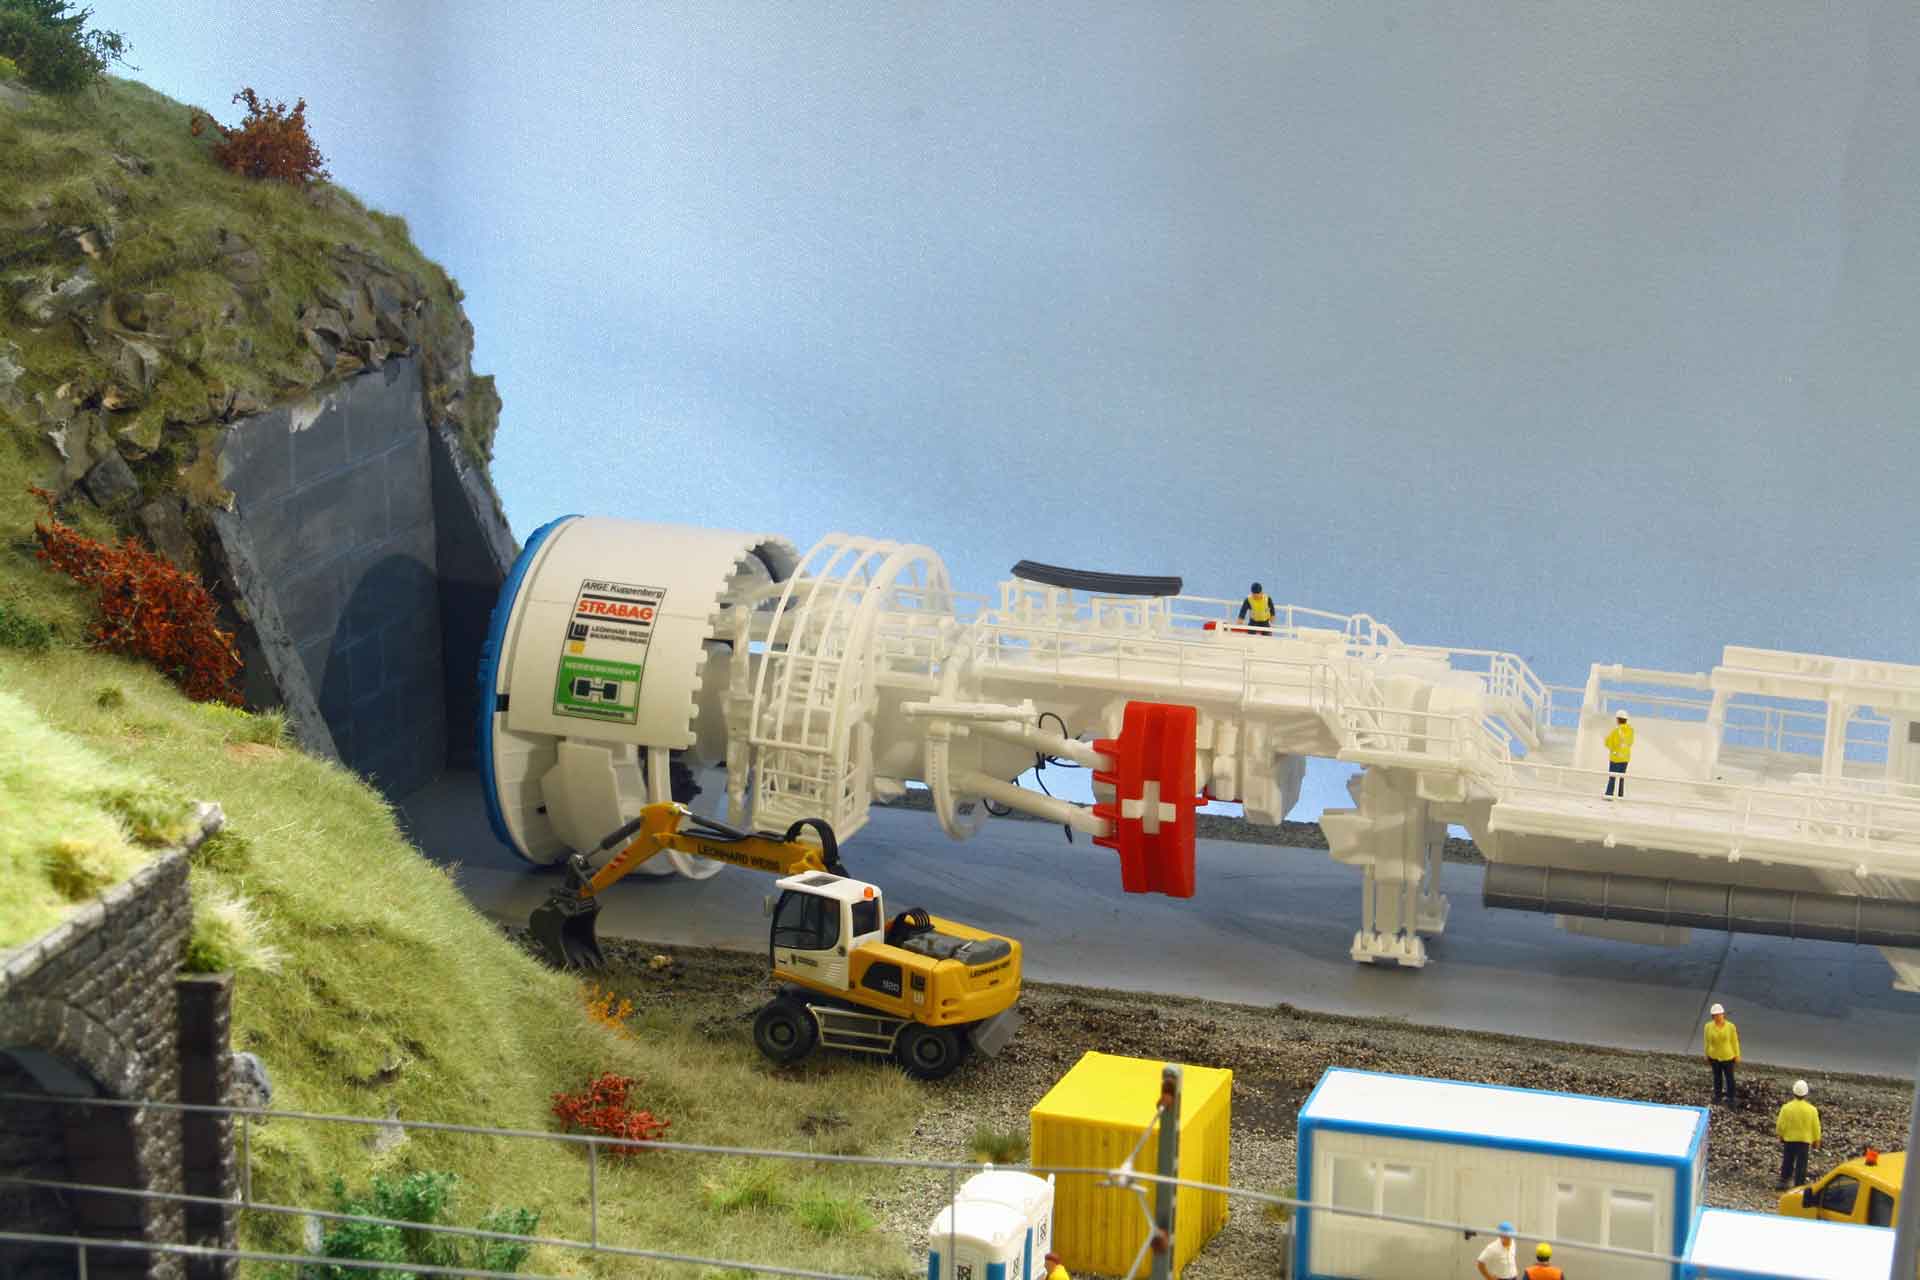

Finally, the prepared model vehicles are placed in their designated positions and fixed in place with Fixogum. The truck with the Bobcat attached to the trailer will enter the construction site area immediately after the driver has completed the formalities with security. There is also an excavator in the area of the drilling site, which has removed a few pieces of rock before drilling begins. All model vehicles are taken from the Herpa range. Meanwhile, an ICE 1 from Roco is rushing out of the tunnel on the existing railroad line.

Modelling, text and photos: Heinz Hofmann
Materials used
Airbrush4you: Colours www.airbrush4you.de
DIY-store: Styrodur sheets and aluminum mesh
Busch: fence www.busch-model.com
Faller: Tunnel boring machine, ESTW, construction container, and toilet
www.faller.de
Herpa: construction site vehicles
www.herpa.de/baufahrzeuge
Miniatur: bushes
www.mininatur.de
mmh: construction site sign and license plates
www.3d-decalsandmore.de
Preiser: figures
www.preiserfiguren.de
Roco: ICE 1
www.roco.cc
RTS: Ultra-light putty, textured pastes, stones, grass flock, and glue
www.rts-greenkeeper.de
Schrumpfmich: figures (highlights or particular scenes)
Tillig: tracks and blue metal
www.tillig.com